


Virtual SAN is the solution VMware introduced to meet the needs of remote and branch offices at very cost effective pricing.
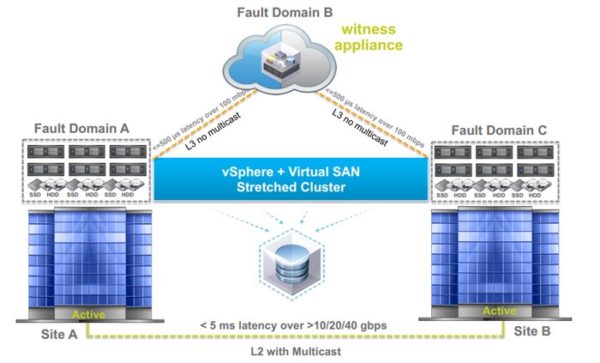
Despite the 25 VMs limit per site, the very interesting feature introduced with VSAN ROBO edition is the capability of running Virtual SAN on only 2 nodes with the use of a witness appliance (ESXi nested) that doesn't require an additional license.
Blog series
Virtual SAN 2-node cluster setup for ROBO - pt.1
Virtual SAN 2-node cluster configuration - pt.2
Configure VSAN network
Select the host to enable VSAN and go to Manage > Networking > VMKernel adapters tab. Click Add host networking icon to setup the new VMKernel adapter.

Select VMKernel Network Adapter option and click Next.

In the Select an existing standard switch field, click Browse and select the vSwitch to use. Click OK to confirm then Next.

Enter a Network label and specify the VLAN ID to use. Enable the Virtual SAN traffic service and click Next.

Assign a static IPv4 address and a Subnet mask then click Next.

Click Finish to save the configuration.

Repeat same steps for the other host used for VSAN setup.

Configure VSAN cluster
If your cluster is configured with vSphere HA, you can use Virtual SAN with a vSphere HA cluster only if the following conditions are met:
- The cluster's ESXi hosts all must be version 5.5 or later
- The cluster must have a minimum of three ESXi hosts
If you have only two hosts, before configuring VSAN make sure vSphere HA is disabled.

Select the cluster to configure and go to Manage > Settings > General tab. Click on Configure button.

Set Add disk to storage field as Manual and choose Configure two host Virtual SAN cluster option. Click Next to continue.

If the all the hosts in the cluster have a VMKernel adapter configured for VSAN traffic enabled, click Next.

Select which disks should be claimed for cache in the VSAN cluster and click the Claim for cache tier icon.

Select which disks should be claimed for capacity in the VSAN cluster and click the Claim for capacity tier icon.

Take a look at the Total cache and capacity available in the VSAN cluster and click Next to continue.

Select the Witness host previously configured and click Next.

Select the Witness' disks for cache and capacity tier then click Next.

Click Finish to complete the configuration.

When the configuration has been completed, the Virtual SAN is set as ON.

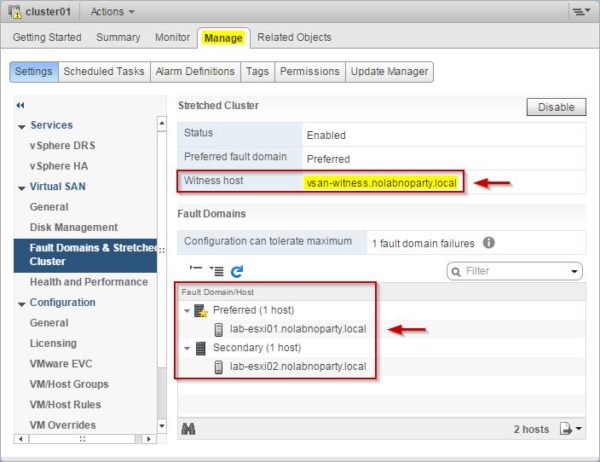
Check Fault Domains configuration from Manage > Settings > Fault Domains & Stretched Cluster tab.
Fault Domains allow to maintain a full copy of the virtual machine data even when a rack fails since virtual machine components are deployed across the Fault Domains. In case of a single rack failure will not make the VM inaccessible.
In the Monitor > Virtual SAN > Health tab you can check the VSAN status.

The new vsanDatastore storage is now available in the storage area.

When the configuration has been completed, vSphere HA can be enabled again.

The installation of VSAN solution is pretty easy and cost-effective. There is no need to purchase expensive SANs anymore as well as expensive Support Contracts from storage vendors.


Good series!
Just a reminder though…
vSAN ROBO is a licensed edition that has no host limit, only a maximum of 25 VMs.
vSAN 2 Node can be used with any licensed edition of vSAN (Standard, Advanced, Enterprise, & ROBO).
Cheers,
Jase