To protect backups against deletion, overwriting and ransomware, a Hardened Repository must be configured in Veeam v11 to take benefit of the Immutability feature.
Making backups immutable is the most efficient way to protect your business data against intruders and ransomware attacks.
Blog Series
Veeam v11: Hardened Repository (Immutability) installation - pt.1
Veeam v11: Hardened Repository (Immutability) configuration - pt.2
Veeam v11: Hardened Repository (Immutability) add MFA - pt.3
Configure Veeam repository
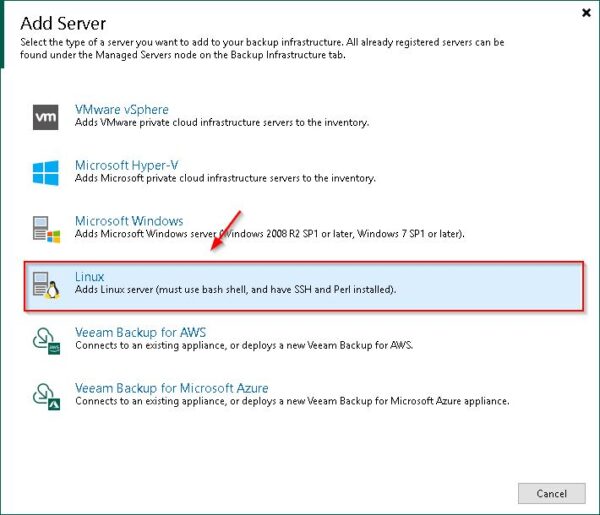
Add the new Linux Server to the Veeam infrastructure. Go to Backup Infrastructure area and right click Managed Server. Select Add server.
Select Linux as server type.
Enter the DNS name or IP address then click Next.
Click Add and select Single-use credentials for hardened repository option to avoid storing the credentials in Veeam Backup & Replication.
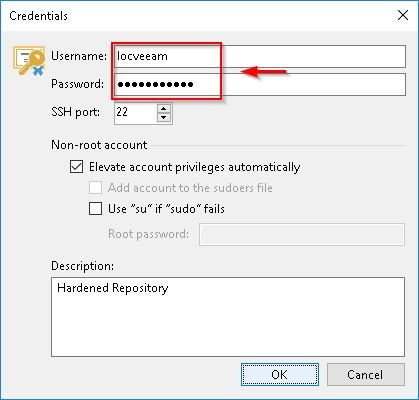
Enter the credentials to connect the Linux Repository then click OK.
When the credentials has been specified, click Next.
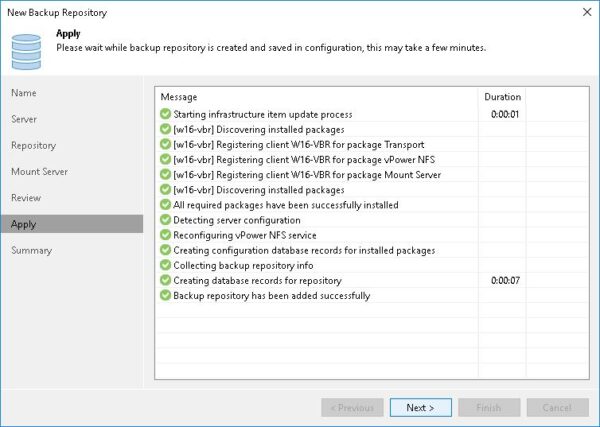
Click Apply.
When the component has been installed, click Next.
The new Managed Server has been added successfully. Click Finish to exit the wizard.
Since the Veeam services have been installed, the user locveeam created in the Hardened Repository must be taken away from sudo group. These credentials are not stored in Veeam Backup & Replication Server.
# sudo deluser locveeam sudo
Since SSH is only needed when the Managed Server is created in Veeam, the SSH service can be safely disabled on Hardened Repository to enforce security.
Create the new repository
Access the Backup Repositories section and click on Add Repository button.
Select Direct attached storage.
Select Linux as operating system.
Enter a Name for the new Backup Repository then click Next.
Select the Repository server configured and click Populate. From the listed paths, select the partition configured in the Hardened Repository to store the backups. Click Next.
Double check if the Path to folder is correct and click Populate to show Capacity and Free space. Enable the following options:
- Use fast cloning on XFS volumes (to take benefit of Fast Cloning technology)
- Make recent backups immutable for "xx" days specifying the retention requested
Click Next.
Specify the Mount server to use then click Next.
Click Apply to continue.
When the repository has been created, click Next.
Click Finish to complete the procedure.
The new Hardened Repository has been created successfully.
Create a Backup Job
From Home area, right click Backup and select Backup > Virtual machine > VMware vSphere.
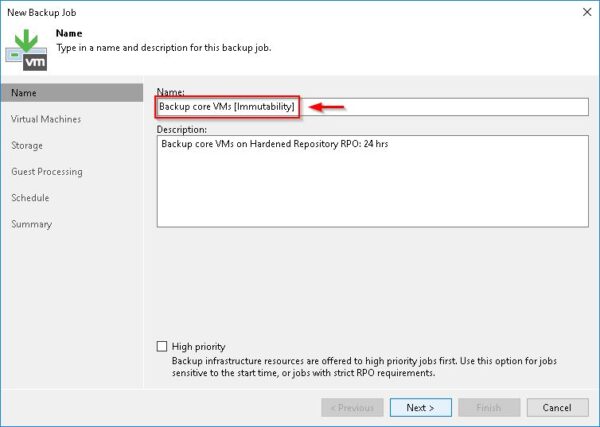
Enter the Backup Job Name and click Next.
Click Add and select the VMs to backup then click Add. In the example TAGS are used.
Click Next.
Select the Hardened Repository as Backup repository and specify the Retention Policy. Keep in mind the retention specified in the Backup Job should be higher than the Immutability retention. Click Next.
You may receive this error.
Click Advanced and check if Create synthetic full backups periodically option is enabled.
Thick Enable application-aware processing if VMs need VSS processing. Click Next.
Configure the desired Schedule then click Apply.
Select Run the job when I click Finish option and click Finish to save the Backup Job configuration.
The Backup Job has been created successfully and started.
The Backup Job is being processed.
After few minutes, the backup completes.
Test Immutability
To test the Immutability, we are going now to delete the backup.
From Backups > Disk, expand the created Backup Job and right click the backed up VM. Select Delete from disk option.
Click Yes to proceed.
As expected, the VM cannot be deleted due to the Immutability feature enabled for the specific job.
Check the Immutability on the Repository
To have a look at how Veeam works with Immutability, login to the Linux Repository and navigate to the folder of the Backup Job.
Run the following command to see the "i" attribute set to the backup files. This is the flag that makes the file immutable.
# lsattr
For a human friendly output run the same command with -l option at the end:
# lsattr -l
As you can see all backup files are set as Immutable. Only the .VBM file doesn't have this attribute since it needs to be updated by Veeam during the backup sessions.
Synthetic Full with Fast-Clone
If the XFS file system has been formatted enabling the Reflink option, during the Synthetic Full operation Veeam leverages the Fast-Clone technology optimizing space and performance.
Secure the Hardeneded Repository
Once the configuration and backup tests have been completed, the Hardened Repository must be secured to avoid unauthorized accesses:
- Make sure locveeam user is not member of the sudo group
- Unplug the Remote Server Management system (iDRAC, iLO, etc.) from the network
- Disable SSH access to the repository
To disable the SSH service in Ubuntu, from the console run the following commands:
# sudo systemctl disable ssh.service
# sudo systemctl stop ssh.service
Part 3 will cover how to add MFA to SSH logins if the SSH service cannot be disabled for policy reasons.


I'm not sure where I went wrong but my jobs fail in Veeam with
Job has been stopped with failures. Error: Permission denied
Failed to create directory '/mnt/xxxx'
Agent failed to process method {FileSystem.DirectoryCreate}.
Any ideas?
It looks something related to permissions. Did you assign the correct chown and chmod permissions to the folder (/mnt/veeamrepo) where the Veeam account saves backups?
Will this work with Debian 11? And will I be able to use fast cloning?
Debian distribution is fully supported. To support Fast Clone technology you must use XFS as file system.
Veeam messes with permissions some times in the step when creating the backup repository in the GUI. Known issue.
rerun this:
sudo chown -R locveeam:locveeam /mnt/veeamrepo/
sudo chmod 700 /mnt/veeamrepo
I'm curious what happens if the hacker with root access credentials to the server can delete or alter the backup files. Thiis whole concept hinges on not having root access to the Linux server, which is exactly the problem with a succesful hack. How would you respond to that?
Hardening best practices recommend to disable both SSH and remote access console (iDRAC, iLO, etc.) to avoid remote access to the device. If you have root access credentials but you can't connect remotely, you have to gain a physical access to delete the backups files... If you have root credentials and physical access to the backup repository, end of story.
If SSH cannot be disabled due to corporate policies, use MFA to secure SSH logins.
I have folloew Part 1 but on Part 2 I want to backup a File share I followed the same basic steps but its not immutable !! Is immutable only for VM's ? or a different set of instructions for File Shares
This is the expected behaviour by design. You can save NAS/FS backups in a hardened immutable repository, but these files will not be immutable.
Hi Paolo,
which is the best scenario in your opinion?
Our client now has a NAS with an NFS share in with we make backup.
Than a CopyJob to an ssh linux repository in the cloud.
Now we are interested on the immutable solution (that is only local).
Is ok to creare a virtual linux vm (the linux immutable repo) on the vsphere, with disk on the nas?
And than, link a copyjob to the immutable jobs that send the backup in the cloud repository?
Thanks
Alessandro
To leverage Hardened Repositories security, the repository itself should be physical with SSH disabled and iDRAC, iLO, etc. disconnected. If you place the repository on vSphere, if the admin password is stolen the intruder can gain access to your repository. Your backup infrastructure could be compromised as well as backup data.
Yes, you can use a Backup Copy Job linked to Immutable backups to send a copy to the cloud... of course this copy won't be immutable unless you have the immutability capability at your provider. Veeam must be configured accordingly.
Thanks for putting together such a comprehensive step-by-step guide. Very informative and something i would have expected to see on the Veeam partner portal but glad i found you all the same.
Once again thank you for this guide.
You cleaned this guide up very nicely since the first time I used it :). Used it today to help someone step by step to setup a system in another country via Teams
Thanks Marius! Glad the post was useful...
not working I HATE IT
Be sure to enter the correct commands.
For basic understanding. Is the Hardened Repository supposed to be a replacement for the regular repository?
Background: So far I back up everything to a normal NFS repository at night (22:00). During the day, I run a Veeam second copy job that backs up the most important backups from the normal Veeam repository to a hardened Linux NFS NAS with XFS.
You can replace a "regular" repository with a Hardened Repository or you can have an additional repository to store for example backup copies of your existing backups jobs or new backups.
Hello and Thank you for your guide!
I have the a problem, that my files aren't immutabel. Can you give me some advice what the problem could be? I have a little diffrent hardware. I have tested id with two HDD and group them by the installation through lmv. Now I had the problem, as i changed the uuid from the group, it cant find it. So i delet the line from vi and wrote the name of my group:
/dev/mapper/vg0-lv--0 /mnt/veeamrepo xfs defaults 0 0
I dont know if this was right or may is the cause of the immutable problem? Anyway, this was just a test with this two HDD, we would like to install ubuntu server on an usb stick to add 6 HDD in a Tower. We would like to run them with Raid 6. I think I will have the same problem with the uuid, can i just write the group name as written above with the exact name of the raid 6 group?
Thank you for your help!
Thank you for your description! It all worked good, the backup can be written to the hardened repository, but if i test it, i can delet de backup in Veaam and also in Linux is no "i" i list the files in the backup folder.
What can i do? I have set up as you shown in your description, set immutability time to 7 days.
Double check the configured settings... if the immutable flag is not applied, maybe there is a misconfiguration.
Hi, after this configuration, I cound't go to the mounted directory /mnt/veeamxfsrepo" (no permission with the cd command. I installed MC, with that I could go to it, but I did'nt see the special i flag. With the mc command I could not delete tha vbk Backup file, but I could delete the vbm file. not sure if my configuration is correct and why i can't see the "i flags". I am a Linux greenhorn..... Thanks!
You can access the /mnt/veeamxfsrepo with the user that has permissions to access that folder (locveeam in the example). Otherwise login as administrator and run the command sudo -i.
thank you for your article, that work perfectly !
Thank you !
Nice job, that work fine for me!
Just a little question.
On my linux repository i have a XFS disk with 1.1T,
When i use "df" i observe this part use 470G
And if i use "du" on the repository folder, i have 1,2T
# df -h
Sys. de fichiers Taille Utilisé Dispo Uti% Monté sur
udev 976M 0 976M 0% /dev
tmpfs 199M 648K 198M 1% /run
/dev/sda1 31G 1,6G 28G 6% /
tmpfs 992M 0 992M 0% /dev/shm
tmpfs 5,0M 0 5,0M 0% /run/lock
/dev/sdb 1,5T 470G 1,1T 31% /data
tmpfs 199M 0 199M 0% /run/user/0
root@xxx:/data/backups# du -sh
1,2T .
root@xxx:/data/backups/Backup# ls -alh
total 1,2T
drwxr-xr-x 2 locveeam locveeam 4,0K 24 mai 03:12 .
drwxr-xr-x 3 locveeam locveeam 54 12 mai 11:22 ..
-rw-r--r-- 1 locveeam locveeam 377G 9 mai 22:43 'backup.FRD2022-05-09T111508_E1F1.vbk'
-rw-r--r-- 1 locveeam locveeam 4,9G 10 mai 03:09 'backup.FRD2022-05-10T030028_D0DE.vib'
-rw-r--r-- 1 locveeam locveeam 6,4G 10 mai 15:37 'backup.FRD2022-05-10T152608_3BC9.vib'
-rw-r--r-- 1 locveeam locveeam 1,3G 10 mai 17:20 'backup.FRD2022-05-10T171657_0206.vib'
-rw-r--r-- 1 locveeam locveeam 3,6G 11 mai 03:10 'backup.FRD2022-05-11T030036_5E29.vib'
-rw-r--r-- 1 locveeam locveeam 6,9G 12 mai 03:13 'backup.FRD2022-05-12T030046_0348.vib'
-rw-r--r-- 1 locveeam locveeam 6,6G 13 mai 03:12 'backup.FRD2022-05-13T030032_EFF9.vib'
-rw-r--r-- 1 locveeam locveeam 380G 14 mai 03:13 'backup.FRD2022-05-14T031234_454C.vbk'
-rw-r--r-- 1 locveeam locveeam 3,5G 15 mai 03:08 'backup.FRD2022-05-15T030028_789B.vib'
-rw-r--r-- 1 locveeam locveeam 3,2G 16 mai 03:07 'backup.FRD2022-05-16T030039_BDB7.vib'
-rw-r--r-- 1 locveeam locveeam 5,9G 17 mai 03:11 'backup.FRD2022-05-17T030029_44C2.vib'
-rw-r--r-- 1 locveeam locveeam 7,4G 18 mai 03:13 'backup.FRD2022-05-18T030047_B245.vib'
-rw-r--r-- 1 locveeam locveeam 9,3G 20 mai 03:20 'backup.FRD2022-05-20T030036_D28B.vib'
-rw-r--r-- 1 locveeam locveeam 380G 21 mai 03:13 'backup.FRD2022-05-21T031219_1879.vbk'
-rw-r--r-- 1 locveeam locveeam 3,3G 22 mai 03:08 'backup.FRD2022-05-22T030034_B240.vib'
-rw-r--r-- 1 locveeam locveeam 3,7G 23 mai 03:08 'backup.FRD2022-05-23T030043_B0F2.vib'
-rw-r--r-- 1 locveeam locveeam 4,8G 24 mai 03:11 'backup.FRD2022-05-24T030031_1D9D.vib'
-rw-r--r-- 1 locveeam locveeam 252K 24 mai 03:12 'backup.FR.vbm'
-rw-r--r-- 1 root root 1,4K 24 mai 03:11 .veeam.61.lock
I test restauration, everything seems ok.
Is this due to veeam deduplication with XFS? This is normal?
Very good guide followed it closely and made adjustment where it was necessary aka username, passwords, servername etc.
Everything was working fine on Ubuntu Server 22.04.1.
Thanks for your work on this guide!
Thanks, I'm glad the article was helpful.
Hi Paolo, could you please have a part 2.5 that explains what it means to then backup to the cloud via Veeam Backup Copy and what configuration is needed to keep the Immutability integrity?
Thanks for such an excellent write-up!
Check out this post: https://nolabnoparty.com/en/veeam-v11-configure-double-immutable-backups-on-prem-and-cloud-pt-1/