VMware introduced in vSphere 6.5 the upgrade tool that allows the upgrade of an existing VCSA to version 6.5 with a simple procedure.
The upgrade procedure can be applied to vCenter Server version 5.5 or 6.0 and Platform Services Controller Appliance 6.0. Two stages are involved during the upgrade process:
- deployment of the new VCSA
- copy of the configuration from source vCenter Server
Keep in mind that the upgrade process doesn't delete the old vCenter Server and its configuration but simply copies data to the new VCSA and then powers the source vCenter off. This allows to quickly restore the old vCenter Server if the upgrade process fails.
Blog Series
VMware VCSA 6.0 to 6.5 upgrade: deploy VCSA - pt.1
VMware VCSA 6.0 to 6.5 upgrade: data copy - pt.2
Prepare the environment
To perform a successful upgrade, there are two main prerequisites that must be met:
- The cluster where the source VCSA resides has the DRS not set to Fully Automated
- If the VCSA uses an external Update Manager you need to run the Migration Assistant
Disable Fully Automated DRS
During the upgrade process, the cluster where the ESXi host that manages the source vCenter Server resides must be configured to have the DRS not set to Fully Automated.
From the vSphere Web Client, right click the cluster to configure and select Settings.
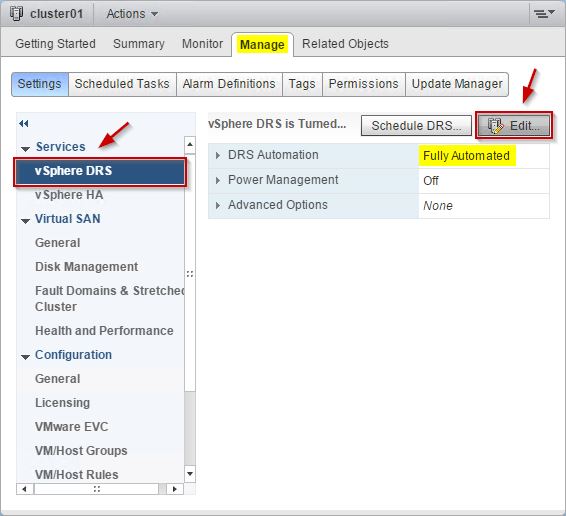
Access the Manage > Settings tab and select the vSphere DRS option. Note that in this example the DRS Automation field is set as Fully Automated. Click Edit to change the DRS settings.
Set the DRS Automation field as Manual and click OK.
The DRS is now set as Manual.
Run the Migration-Assistant
If the VCSA to migrate uses an external Update Manager, the Migration Assistant must be running on the source Update Manager machine.
This tool facilitates the migration of the Update Manager server and database to the new upgraded VCSA. By default the Migration Assistant uses port 9123 but if the port is already in use by another service, it automatically finds a different free port to use.
Log in to the source Update Manager machine as an administrator and copy the migration-assistant directory from the VCSA Installer package.
Double-click VMware-Migration-Assistant.exe to run the tool.
Type the vCenter Single Sign-On administrator password. If no errors are displayed after the pre-checks, the source Update Manager system is ready for the upgrade. Leave the Migration Assistant window open until the upgrade of the VCSA finishes.
Migrate the VCSA
Mount the VCSA Installer ISO file and run the installer.
Stage 1 deployment
From the vCenter Server Appliance installer, click Upgrade option to upgrade an existing VCSA.
Click Next.
Accept the EULA then click Next.
Specify Source appliance parameters and the ESXi host that manages the source appliance. Click Next.
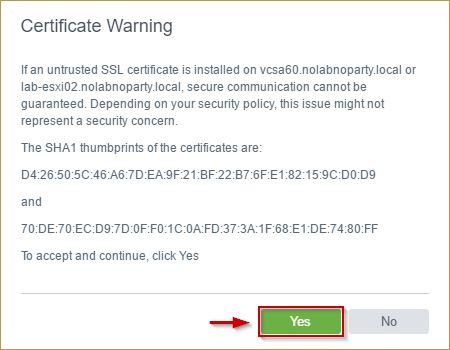
Click Yes to accept the self signed SSL certificate.
If you receive this error message it means the Migration Assistant is not running on the VUM server. Run the tool and try again.
Specify the target ESXi host to deploy the appliance and click Next.
Click Yes to accept the host's SSL self signed certificate.
Type the VM name and specify the Root password. Click Next.
Based on your environment, specify the Deployment and Storage size then click Next.
Select the desired storage to save the VCSA and Enable Thin Disk Mode option to save space. Click Next.
Insert the network parameters and click Next. The assigned IP address is temporary and used during the upgrade process only. When the upgrade has completed the new VCSA will have same IP of the source VCSA.
Click Finish to start the deployment.
The appliance is being deployed to the target host.
When the process has been completed, click Continue to proceed with stage 2. You can also close the wizard and continue the installation later on via browser typing the address https://IPAddress_appliance:5480.
Part 2 will show stage 2 of the VCSA upgrade procedure.


