Installed both ADFS and WAP servers, next step of the ADFS 3.0 setup covers the federation process with Office 365.
The procedure requires two components to install in the ADFS server to perform administrative tasks using the PowerShell commands.
Blog series
ADFS 3.0 setup UPN suffix for Office 365 SSO - pt. 1
ADFS 3.0 SSL certificate signing request - pt. 2
ADFS 3.0 install ADFS Server - pt. 3
ADFS 3.0 install WAP Server - pt. 4
ADFS 3.0 federating Office 365 - pt. 5
ADFS 3.0 install Directory Sync tool - pt. 6
ADFS 3.0 deploy Office 365 - pt. 7
Prerequisites
- UPN suffix set to match federated domain (see part 1)
- Windows 2012 R2 server joined to the domain and with ADFS role installed (see part 3)
- Microsoft Online Services Sign-In Assistant for IT Professionals RTW
- Azure Active Directory Module for Windows PowerShell (64-bit version)
Install Online Services Sign-in Assistant
To provide end user sign-in capabilities to Microsoft Online Services, such as Office 365, the Microsoft Online Services Sign-In Assistant needs to be installed in the ADFS server. Download the tool and run the installer.
When the wizard starts, accept the EULA then click Install to proceed.
The Microsoft Online Services Sign-In Assistant is being installed.
When the installation has completed, click Finish to exit the wizard.
Install Windows Azure AD Module for PowerShell
To perform administrative tasks such as user management, domain management and for configuring single sign-on, the Azure Active Directory Module for Windows PowerShell is another component to be installed in the ADFS server. Download the module and run the installer.
When the installation wizard opens, click Next to begin the installation.
Accept the EULA then click Next.
Leave default location and click Next.
When ready to proceed, click on Install button to install the module.
The module is being installed in the system.
When the installation has completed successfully, click Finish to exit the Setup.
Federating Office 365 domain
When the server installation has been completed, open the PowerShell shell from the icon placed on the desktop during the Azure Active Directory Module for Windows PowerShell setup.
To connect to your online service (Office 365), use the cmdlet:
PS C:\> Connect-MsolService
Enter the Office 365 Admin credentials then click OK.
username: 365admin@nolabnoparty.onmicrosoft.com
password: password
The connection to Office 365 platform has been established.
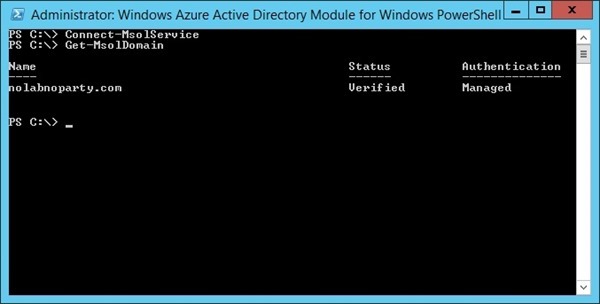
To federate domains, they must be verified in the Office 365 portal. To check if the domain is verified, run the following command:
PS C:\> Get-MsolDomain
Once the domain is listed as verified, use the following command to federate a single domain:
PS C:\> Convert-MsolDomainToFederated -DomainName nolabnoparty.com
To use the same ADFS servers to federate other domains in the same tenant, use the command:
PS C:\> Convert-MsolDomainToFederated -DomainName nolabnoparty.com -SupportMultipleDomains:$true
To check the federated domains, run the cmdlet:
PS C:\> Get-MsolDomain
Part 6 will cover the installation of the Directory Sync tool needed by the system to synchronize Active Directory objects with Office 365.


Followed your guide and everything works like a charm!
Very useful guide!
where is the set-msoladfscontext command used?
I didn't use set-msoladfscontext since I'm running the commands directly from the ADFS server.