
The new Veeam Backup & Replication 11 provides the capability to have immutable backups leveraging Linux with the Hardened Repository.
Already introduced in Veeam v10 to store backups on Object Storage S3 with Object Lock enabled, the Immutability feature protects your backups against overwriting, accidental deletion, ransomware attacks and internal intruders.
A good backup design is the key for a successful data protection strategy to avoid potential data loss that can affect the business. If data are not well protected, a ransomware attack could be a nightmare for administrators.
Blog Series
Veeam v11: Hardened Repository (Immutability) installation - pt.1
Veeam v11: Hardened Repository (Immutability) configuration - pt.2
Veeam v11: Hardened Repository (Immutability) add MFA - pt.3
Requirements
To configure the Immutability for data backups, you need to meet some requirements:
- Veeam Backup & Replication v11.
- Although the solution can run as virtual machine, a physical machine is strongly recommended for security concerns.
- A 64bit Linux distribution to configure the repository. Suggested the Ubuntu 20.04 LTS or later distribution for highest quality of reflink, RHEL/CentOS 8.2 or later, SLES 15 SP2 and Debian 10.
- The Linux Server should support XFS (enable the use of the Veeam fast cloning technology) and it is the recommended file system to use.
Since backups cannot be modified due to Immutability, only forward incremental with periodic synthetic or active full backups are supported. For Backup Copy Jobs, NAS backup, log shipping, RMAN/SAP HANA/SAP on Oracle backups won't take advantage of the Immutability option but can be stored on the same repository.
Backup Copy Jobs configured with GFS retention policy will be able to use the Immutability feature.
For Hardened Repository implementation, Veeam components only access the Linux Repository with non-root credentials and only port TCP 6162 is required for the communication between Proxy and Repository (TCP 2500 to 3300 are assigned when needed).

Enforce security for Hardened Repository
To better protect backup data, you should follow some guidelines to enforce the security:
- Although persistent credentials can be used, is recommended the use of the new Single-use credentials for hardened repository during the deployment to avoid storing the credentials in Veeam Backup & Replication.

- SSH should be disabled
- iDRAC, iLO or other remote management solutions to the repository should be disabled or hardened
- Time should be synced with a reliable NTP Server to avoid time changes from a potential attacker. Time changes could alter the Immutability retention.
Install Ubuntu Server
For this procedure the Ubuntu Linux distribution is used to implement the Hardened Repository. Download the .ISO file for Ubuntu Server 20.04 LTS then boot your machine to run the installation wizard.
Select the language to use and press Enter.

Specify the keyboard layout to use, select Done then press Enter.

By default the NIC is set to use DHCP. To assign a static IP address, select the NIC and press Enter. Select Edit IPv4 from the available options. If your physical server provides two or more NICs, you can create a bond (teaming) to increase the available bandwidth.
In the Network connections page, select Create bond option.

Enter a Name and specify the Devices to use. As Bond mode select 802.3ad from the drop-down menu then click Create.

Highlight the just created bond and press Enter. Select Edit IPv4 and press Enter.

Select Manual as IPv4 Method and press Enter.

Fill all the requested information then select Save and press Enter.

When the static IP address has been set, select Done and press Enter.

If you don't use a Proxy, select Done and press Enter.

Leave default value, select Done and press Enter.

Set Custom storage layout to create a custom partitions schema. Select Done and press Enter.
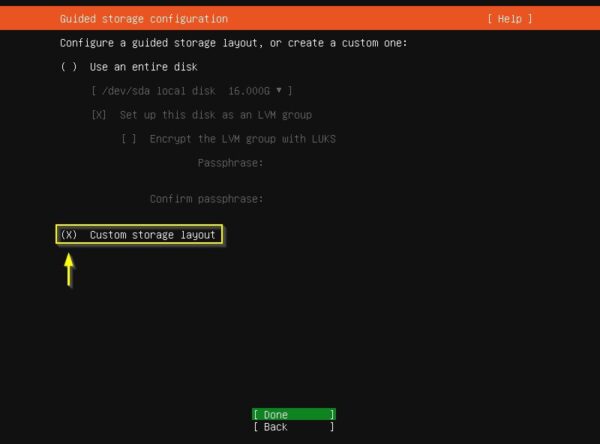
In this example, the storage in use has two local disks:
- One disk for the OS
- One disk to store backups
Highlight the first disk /dev/sda and select Add GPT Partition.
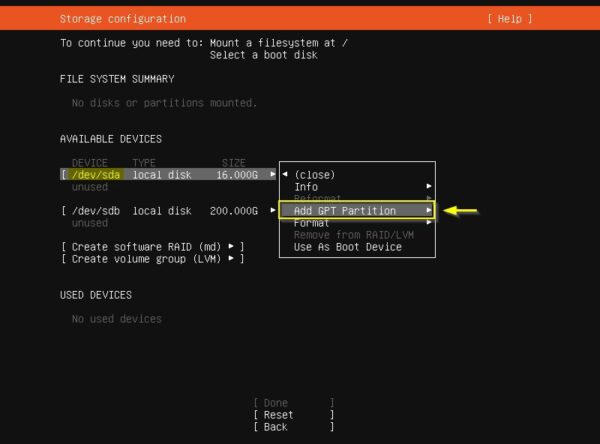
Leave the Size field blank to use all the available space for the partition then select Format to specify the file system. In the example, the file system ext4 has been used. Select Create then press Enter.

Now select the second local disk /dev/sdb and choose Add GPT Partition. Note there is a new bios_grub partition type in the first configured partition.
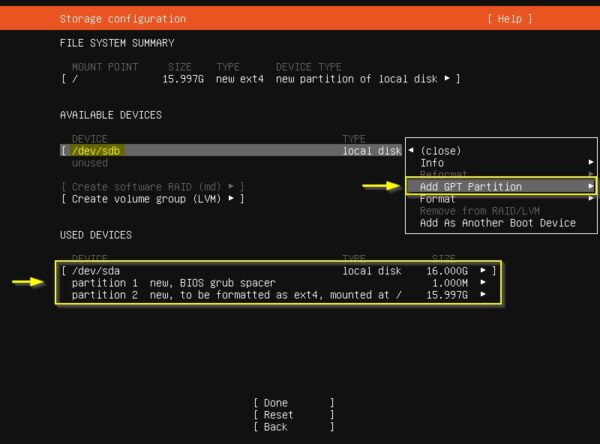
Leave the Size field blank and use xfs as Format type. Create a custom Mount point (in the example /mnt/veeamrepo) and press Enter to confirm. XFS with Reflink works pretty the same way as ReFS to optimize performance and disk consumption (size of synthetic copies are smaller and the process faster). Veeam calls this technology Fast Clone.

Once the partitions layout has been completed, select Done and press Enter.

Select Continue.

Enter the Name, Server name, Username and Password the select Done.

Select Install OpenSSH Server option to enable SSH. Select Done.
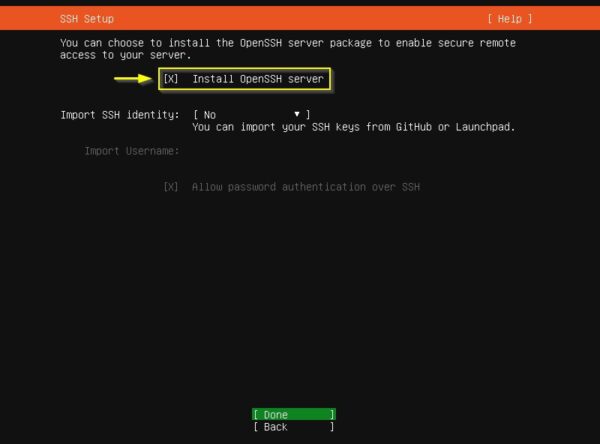
No need to install additional features. Select Done then press Enter to begin OS installation.

The Linux OS is being installed in the system.

When the installation has completed, select Reboot Now.
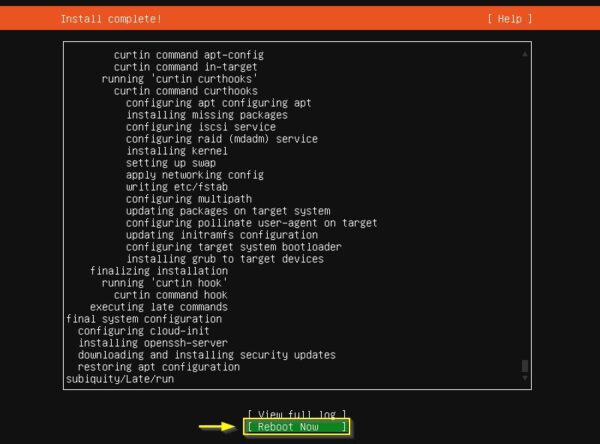
Configure the Repository
Login as the account configured during the OS installation (in the example administrator) and enter the password.

To keep the system up to date, install latest upgrades with the command:
# sudo apt-get upgrade

Check the file system in use for the partition that will be used by Veeam to store the backups. In the example, /mnt/veeamrepo is the dedicated partition formatted as xfs.
# df -Th

Create a local account
You need to create a dedicated local user with the correct permissions so that the Veeam Transport Service has the correct rights to the Veeam mount.
Create a new account used by Veeam and create the password.
# sudo useradd locveeam --create-home -s /bin/bash
# sudo passwd locveeam

We need temporarily to allow the new user to execute commands as root to install the required Veeam services. The user is added to the sudo group.
# sudo usermod -a -G sudo locveeam
![]()
Configure the mount point
If you want to take benefit of Fast-Clone technology (Fast Clone is based on the Reflink) to optimize space and performance during Synthetic Full operations, by default Ubuntu doesn't enable Reflink when partition is formatted XFS during the installation procedure. Veeam requires the file system to be formatted with Reflink enabled to leverage Fast Clone capability.
Access your hardened repository and retrieve the list of disks installed in Ubuntu to identify the disk used as repository.
# sudo fdisk -l

Since the partition has been mounted during the installation procedure, we need first to unmount the partition.
# sudo umount /mnt/veeamrepo
![]()
Once the partition has been unmounted, we need to format the partition with the parameters required by Veeam to leverage Fast-Clone technology: reflink and enable CRC.
# sudo mkfs.xfs -b size=4096 -m reflink=1,crc=1 /dev/sdb -f

Since the UUID has changed due to this operation, we need to retrieve the new UUID and amend the /etc/fstab file to mount the partition automatically.
# sudo blkid /dev/sdb

Update the /etc/fstab file with the new UUID.
# sudo vi /etc/fstab

Reload configured partitions.
# sudo mount -a
![]()
Assign permissions to the mount point
Assign permissions to access the /mnt/veeamrepo folder to the locveeam account using the following commands:
# sudo chown -R locveeam:locveeam /mnt/veeamrepo/
# sudo chmod 700 /mnt/veeamrepo

Check the assigned permissions.
# ll /mnt

The configuration of the physical Hardened Repository is now complete. Part 2 will cover the configuration of Veeam Backup & Replication v11 to take benefit of the Immutability feature.


Thanx for the document. I'm a newbie Linux user, so I follow your instructions to the T
My Notes on installation:
Reboot before "Enable XFS with Reflink" - Drive letters changed
The username "Administrator" got removed during the setup changes
I had to use "# mkfs.xfs -b size=4096 -m reflink=1,crc=1 /dev/sdb -f" with the sudo, otherwise it failed with permissions. In your screenshot you used sudo as well, but in the instruction there is no sudo (Remember: I copy/paste)
Now for part 2 🙂
Not sure to understand what you mean for "Drive letters changed"... don't be confused between disks and partitions. "Administrator" got removed during the setup changes?
Command to format the partition is now fixed (typo). sudo must always be used to run commands.
Hi Paolo.
Just wanted to convey my appreciation for the guide. Helped me immensely.
We managed to convert a Dell R730XD Server into an immutable repo!
Cheers,
Stuart
Thanks Stuart!
Glad my post was useful.
Paolo,
Thanks for this guide,
I am trying to do this same guide but with RAID 1 mdam, how will the UUID will be editied under fstab?
regards!
Gerardo Andrade
You need to retrieve the corret UUID then use the command sudo vi /etc/fstab to amend the UUID with the new value.
Thanks again Paolo,
worked with with raid1.
Regards!
A lot of the screenshots have trailing slashes in the paths while the example command do not. Which is correct? Thanks.
Both are correct... if you use the tab while typing the path, the slash at the end is automatically added.
excellent guide!
In the part "Configure the mount point"
I had to umount /veeamrepo before running mount -a
For this part, "Now select the second local disk /dev/sdb and choose Add GPT Partition. To format with XFS".
Has anyone figured out which disk to map to while using a fibre connected multipath device in Ubuntu Linux?
Mine is showing /dev/sdc1, /dev/mapper/mpatha-part1, /dev/sdd1 and /dev/sde1 . I would think I would map it to /dev/mapper/mpatha-part1 ?
Hi,
Thank you for this pretty good document.
I just don't understand why you first create a /veeamrepo mount point and after a /mnt/veeamrepo ?
You can use /mnt/veeamrepo from the installation... Or always use /veeamrepo.
Regards.
Correct, you can configure /mnt/veeamrepo directly from the installation. Fixed the screenshots.
Figured out how to map multipath drives.
After "sudo fdisk -l" in "Configure the mount point" section. Do these commands below.
1. sudo umount /mnt/veeamrepo
2. sudo mkfs.xfs -b size=4096 -m reflink=1,crc=1 /dev/mapper/mpatha-part1 -f
3. sudo blkid | grep mpatha-part1 (If that doesn't work than run sudo blkid | grep mpatha )
4. Update fstab file with the UUID you got from "sudo blkid | grep mpatha-part1"
4a. It should look similar to this in your fstab file.
/dev/disk/by-uuid/4234fcsa-3efs-3jfm-effs-43fcs33f4jd3 /mnt/veeamrepo xfs defaults 0 0
Than continue on past "sudo mount -a" in this guide.
Thanks for the info!
After I run sudo mkfs.xfs -b size=4096 -m reflink=1,crc=1 /dev/sdb -f the UUID changes but the mount point shows as missing and cannot be mounted. PLease advise
thanks for the wonderful article . repo permission issue
# sudo chmod 700 /mnt/veeamrepo
700 doesnt have enough permissions, ls -l /mnt/veeamrepo/
ls: cannot open directory '/mnt/veeamrepo/': Permission denied
when selecting fast cloning on XFS volumes , get the following error ( Failed to save Backup Repository: Permission denied)
i think 705 or 707 is the least
700 works fine. Just check your commands well. I have implemented this a couple of times and haven't had any issues. By the way, what Linux distro are you using?
The tuturial ever on how to implement the Linux immutable repository in Veeam. This has helped me alot
Thanks, glad the post was useful.
Hi Paolo thanks for the blog. I am just starting the process of transforming a Dell PE R530 into an immutable repository, I only have one question, I only have one RAID 5 Virtual Disk with all the disks (6x4TB HDD), can I create in Ubuntu two partitions on the same disc, one for the OS and one for the repository?
Are you using LVM in your Linux installation?
Hi! First of all, thanks for creating this step by step guide 🙂
I have followed the guide and everything seems to be correct. When adding the Linux server in Veeam, I get this errormessage:
Error Installing Veeam Data Mover service Error: Client not connected.
I cant find any info about this online. Do you have an idea on what the problem could be?
Are you using the same service account configured in the Hardened Repository?
Did you add the service account in the Hardened Repository to the SUDO group?
Hi! Yes, I am using the service account as configured in Hardened Repository: Locveeam-. I tried logging in using SSH with locveeam user, and was able to sudo without problems.
I dont think there is a credential problems, because I tried to login as root/administrator to add the Veeam transport service resulting in the same error
Hi again
Issue is resolved. I did the following:
sudo vi /etc/ssh/sshd_config
Added:
KexAlgorithms diffie-hellman-group1-sha1,curve25519-sha256@libssh.org,ecdh-sha2-nistp256,ecdh-sha2-nistp384,ecdh-sha2-nistp521,diffie-hellman-group-exchange-sha256,diffie-hellman-group14-sha1
Ciphers 3des-cbc,blowfish-cbc,aes128-cbc,aes128-ctr,aes256-ctr
Then restarted ssh service with command: service ssh restart
Great step by step guide thank you! I am also new to Linux. I have followed this step by step but have got stuck on updating the fstab file.. # sudo vi /etc/fstab when I run this command I get the same results in your screenshot with the new UUID. However it just gets stuck there with lots of tilde symbols down the left hand side to the bottom of the page and then --- INSERT --
I can't then proceed to reload the configured partitions. Have I missed something?!
I have the same issue. Anyone have the answer to this?
Hi, thanks for this artikel!
Why is it not possible that the administrator change directory to /mnt/veeamrepo.
Is this correct? I thought the admin has permission to all?
Thanks!
Problem: after deploying veamtransport.service the service is not starting with Error 255.
Hello I followed your doc and allocated 1tb to the /mnt/veeamrepo partition. Do you know the steps If i need to expand it. Running in vmware.
thanks
It is not a good idea to have the Hardened Repository as VM for security reasons. You can expand the disk in vSphere as you normally do for other VMs, then you need to expand the partition inside the Linux OS... are you using LVM?
Followed the guide exactly but keep getting a Permission Denied (password) error when trying to add the Single Use credentials. I have change the locveeam password several times and I have verified that the locveeam account has the correct permissions to the repo mount point. Any suggestions?
Did you add the account to sudo group?
Yes, that was my initial thought, that I had skipped that step. Below are my most recent commands to try to correct the issue. I even changed the password to something short and simple just for testing.
administrator@lx-veeamxfsrepo:~$ sudo passwd locveeam
[sudo] password for administrator:
New password:
Retype new password:
passwd: password updated successfully
administrator@lx-veeamxfsrepo:~$ sudo usermod -a -G sudo locveeam
I have used this article on many installations and it has worked flawlessly. IMO a little more could be added to show how to edit the repository guid.
I have since had to change the permanent gateway IP address on the device and all edits i have made to date are erased when the system reboots.
Please provide the correct instructions to change the gateway IP on bond0 (BondZero)
how can i check that reflink and CRC is enabled on ubuntu? (22.04)
Hi, when reloading configured partitions, I kept on having the error /mnt/veeamrepo: UUID does not exist.
Any idea why?
Did you update the UUID for the new partition in the fstab file?