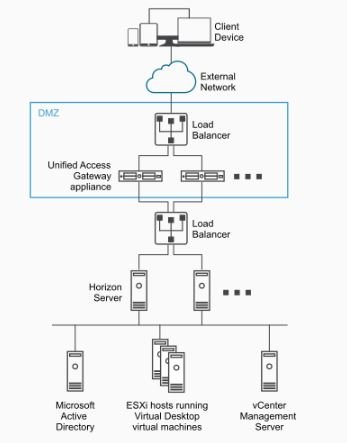
Normally installed in a DMZ area, the Unified Access Gateway (UAG) is an appliance used to ensure incoming traffic comes from a strongly authenticated remote user.
Unified Access Gateway directs authentication requests to the appropriate server and only to desktop and application resources to which the user is actually entitled.
Unified Access Gateway
Unified Access Gateway acts as a proxy host for connections inside your company's trusted network adding an extra layer of security.
The appliance presents some hardening settings since it is designed specifically for the DMZ:
- Updated Linux Kernel and software patches
- Multiple NIC support for Internet and intranet traffic
- Disabled SSH
- Disabled FTP, Telnet, Rlogin, or Rsh services
- Disabled unwanted services
Compared to VPN, the UAG appliance has some advantages:
- UAG is design for performance and security.
- Users can access their virtual desktops using the Horizon Client only without using different software to connect.
- UAG applies access rules automatically requiring less administrative effort to maintain the required rules.
Deployment settings
The Unified Access Gateway can be deployed with different configurations. You can specify one, two, or three NICS settings:
- 1 NIC - this is the simplest configuration where all network traffic is combined onto a single network.
- 2 NICs - one NIC for unauthenticated access and back-end authenticated traffic and management traffic are separated on the second NIC.
- 3 NICs - all traffic is separated in specific networks.
Firewall ports to open
To avoid connection issues in your Horizon infrastructure, the appropriated ports must be open in your firewall. The following table lists ports to open.
Deploy the UAG appliance
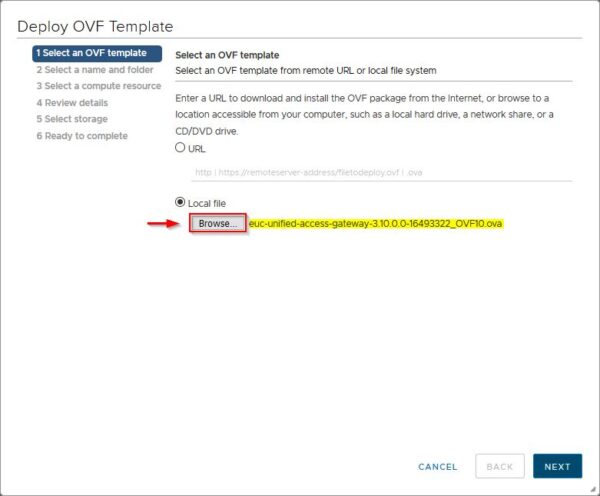
After downloading the UAG software in OVA format, from vSphere Client right click the object where to install the appliance and select Deploy OVF Template.
Click Browse and select the .OVA file downloaded from VMware. Click Next.
Enter a Virtual machine name and select a location. Click Next.
Specify the compute resource and click Next.
Click Next.
Select the Configuration required and click Next.
Select the Storage to store the appliance and click Next.
Specify the Destination Network and click Next.
Enter the network parameters and click Next.
Click Finish to proceed with UAG deployment.
Configure the Unified Access Gateway appliance
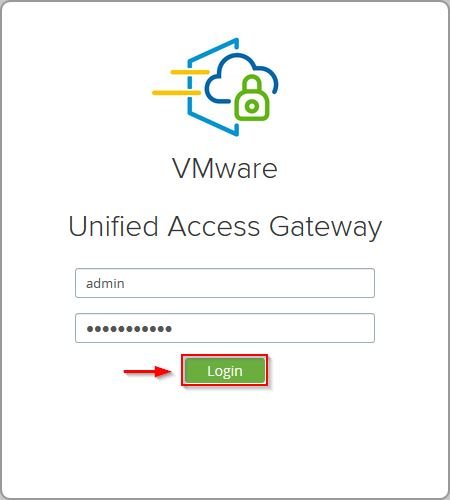
Once the UAG has been deployed, open your preferred browser and enter the address https://<IP_UAG>:9443. Enter the credentials and click Login.
Click Select in the Configure Manually side.
Enable the Edge Service Setting switch under General Settings to configure the Horizon environment.
Click the Horizon Settings' icon.
Enter the Connection Server URL and the Connection Server URL Thumbprint. Enable the requested protocols such as PCOIP, Blast and specify the URL for the configured protocols used to connect Horizon infrastructure from external. Click Save when done.
To find the correct Connection Server URL Thumbprint, right click in the browser the certificate used to connect the Connection Server. In the Details tab search for Thumbrint and copy the value. This value needs to be pasted to the appropriated field.
If the entered parameters are correct and the correct firewall ports open, you should see all items with a green circle. If the Horizon Destination Server is red, it means the UAG is unable to resolve the FQDN of the Connection Sever. As workaround, use the Connection Server IP Address instead of FQDN.
In the Horizon Console, access the Servers area under Settings and go to Connection Servers tab. Select your Connection Server and click Edit.
Disable the HTTP(s) Secure Tunnel and both PCoIP and Blast Secure Gateways. Click OK to save the configuration.
Now access the Gateways tab and click Register.
Enter the name of the appliance specified in the Advanced Settings of the UAG and click OK.
The appliance has been registered successfully.
Under Monitor, select Dashboard and click View.
In the Gateway tab you can find the configued UAG.
Testing the connection to a VD, the Security Gateway used by Horizon is the configured UAG.
Export the UAG configuration
To export the configuration, in the UAG configuration UI you can find the Export Unified Access Gateway Settings option under Support Settings. You can export the configuration in JSON or INI format by clicking the appropriated options.
The settings are exported to your computer. Click OK to save.
The Unified Access Gateway configuration is now complete and the appliance is ready to manage the connection requests.


Hi Paolo,
Nice writeup. I take it you then point your external dns record to point to UAG, instead of horizon Connection Server, so the traffic goes via UAG?
If you connect from external, the traffic goes through the UAG.