PernixData FVP 3.0 configuration allows the administrators to enable the use of host-installed Flash and RAM to accelerate storage performance.
The configuration process includes licensing, setup of acceleration resources and Datastores/VMs to accelerate.
Blog series
PernixData FVP 3.0 installation - pt.1
PernixData FVP 3.0 configuration - pt.2
License activation
FVP 3.0 introduced a new and easier way to manage licensing: you only need a valid license key and the activation takes places without further configuration.
First step to perform before configuring FVP is the license activation.
From your favorite browser access the FVP Management Console typing the address http://FVP_address:60001/login. Enter the correct credentials then click Login.
Start the trial
Select Licensing tab, select the vCenter to configure and click Start Trial.
Click OK to activate the trial.
The product has been activated.
Enter the license
If you bought the license, select Licensing tab and the vCenter to configure then click + Enter FVP License Key option.

The product has been activated.
Create a FVP Cluster
From PernixData Hub menu, select FVP to access the configuration page.
Click + Create to create a FVP Cluster.
Enter a Name, select the vSphere Cluster then click OK.
The new FVP Cluster has been created successfully. Click the cluster name to access the setup page.
From this page you can monitor and configure the FVP Cluster.
Add acceleration resources
Select the Configuration tab and click + Add to add Acceleration Resources.
Same setup can be done from the dropdown menu.
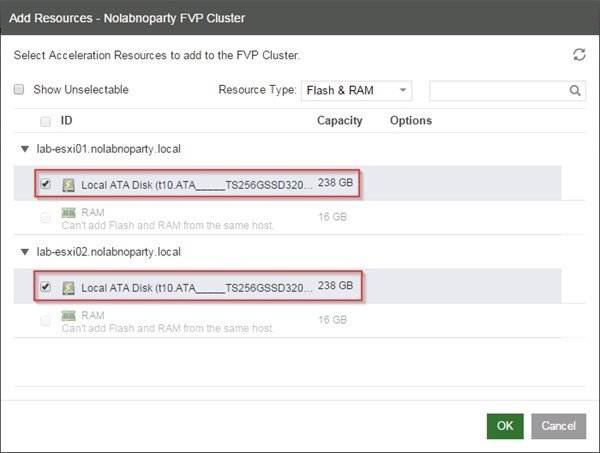
Select an option from the Resource Type menu to filter available resources.
Select the resources to use and click OK. Just remember you can't add Flash and RAM from the same server.
Selecting RAM as resource instead, you need to specify the amount of memory to allocate. Click Done then OK to save the setup.
The selected resources have been added to the cluster.
Add Datastores/VMs to the FVP Cluster
Select Datastores/VMs item and click + Add Datastores to add datastores to accelerate.
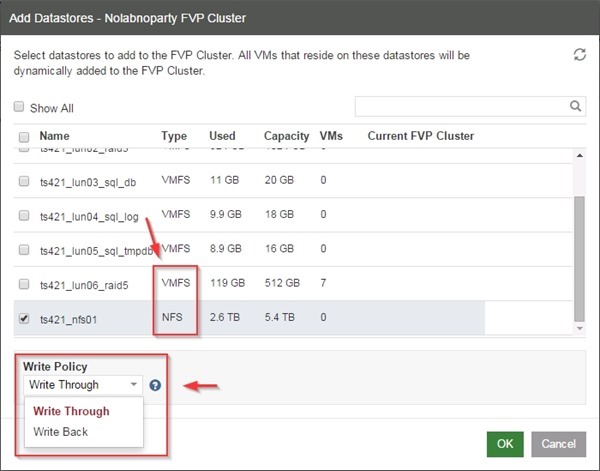
In the screen are listed the supported datastores VMFS and NFS type. Select the Datastore to add to the FVP Cluster, specify the Write Policy and click OK to confirm.
Two Write Policies type can be used:
Click + Add VMs to add VMs to accelerate.
From the list, select VMs to add to the FVP Cluster and specify the Write Policy to use. You have to specify also the Write Replication if Write Back mode is chosen. Click OK to save the configuration.
The VM is added to the FVP Cluster.
Configure Fault Domains
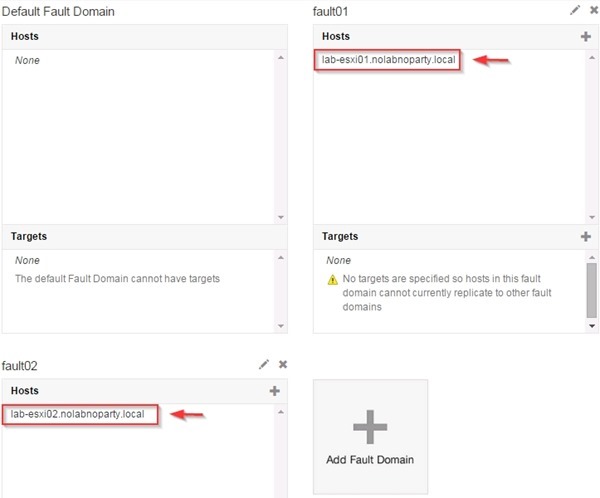
Fault Domains is a feature useful to control where the replica lands when the Write Back mode is used. By default the hosts configured in the FVP Cluster are identified under Default Fault Domain area.
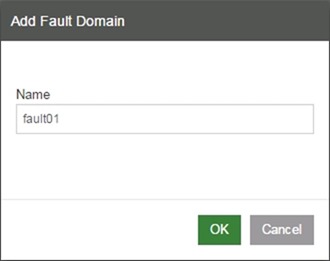
Click Add Fault Domain button to create Fault Domains. In the example two Fault Domains are created: fault01 and fault02.
During the Fault Domain configuration, you can add hosts in any order and control where the replica lands when VMs run in any host in Fault Domain. Type a Name then click OK.
To logically partition the host, click the + plus icon to add a host to first Fault Domain. Select a host from the list and click OK to confirm.
Repeat same step for the second Fault Doman.
Associate Fault Domains
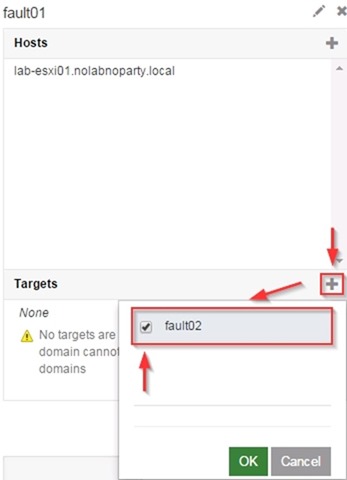
To associate Fault Domains click the + plus icon in the Target area of the Fault Domain (i.e. fault01) you want to configure. From the available Fault Domains, select the one (i.e. fault02) you want to associate then click OK to confirm.
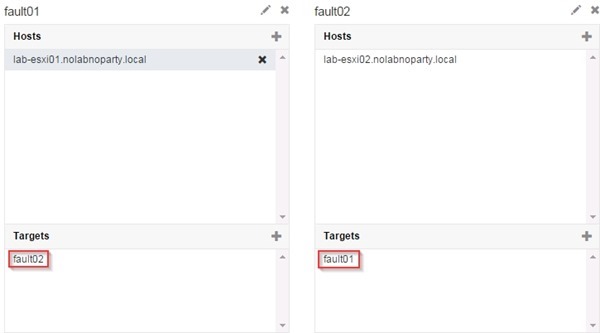
Do the same for the fault02 Fault Domain.
The result is that VMs running in fault01 host will have the replica landing in fault02 Fault Domain.
If due to DRS or custom rules the VMs move to different hosts in fault01 or fault02, the replication is automatically changed.
Advanced setup
In the Advance tab you can configure Blacklist, VADP and Network Configuration.
Blacklist
To ensure a VM is never accelerated, click + Add VMs to add the VM to the black list.
VADP
Specify VADP VMs in your environment so that FVP works seamlessly with relevant backup processes. VADP VMs won't be accelerated by FVP.
Network Configuration
By default FVP choses the vMotion network for the acceleration traffic, but you can specify a different network.
Click Edit Networks to change the network to use. You have two options available.
One network for all hosts option. Select the network to use then click OK to confirm.
A network per host option. Select the network to use for the hosts in the cluster then click OK to confirm.
Reporting
From the Reporting tab, you have some analytics useful to figure out the FVP Cluster behavior.
The configuration of PernixData FVP 3.0 is now complete.


