If no physical server is available and a NAS device is the only repository installed in your network, you can configure a VM Linux as a Hardened Repository using iSCSI to make backups immutable.
Using a supported Linux distribution, it is possible to map a LUN via iSCSI to a Linux VM in your virtual infrastructure and use it as backup repository for your Veeam backup infrastructure.
The storage device used in this procedure is a Synology NAS and the OS installed on the VM is a Linux Ubuntu 22.04.3 LTS.
Configure a Linux Hardened Repository using iSCSI
Before starting the configuration of the Linux VM, you need to create an iSCSI Initiator as well as a LUN that will be used to store backups.
Configure the iSCSI Initiator
To configure an iSCSI LUN in Linux Ubuntu, make sure the open-iscsi package is installed in the system in use.
# sudo apt -y install open-iscsi
Enable the iSCSI service each time the server boots.
# sudo systemctl enable open-iscsi
# sudo systemctl enable iscsid
Edit the /etc/iscsi/initiatorname.iscsi file to specify the correct iSCSI Initiator.
# sudo vi /etc/iscsi/initiatorname.iscsi
The system is configured with a default InitiatorName setting that needs to be adjusted.
Retrieve the configured IQN from the storage device used as backup repository.
Replace in the /etc/iscsi/initiatorname.iscsi file the default InitiatorName with the IQN configured in the storage and save the file.
InitiatorName=iqn.2000-01.com.lab:NAS-DS918BCK.Target01
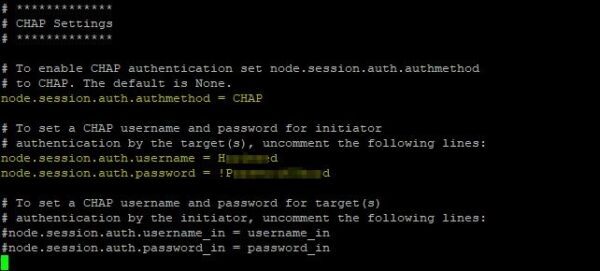
If the iSCSI connection requires authentication, edit the file /etc/iscsi/iscsid.conf.
# sudo vi /etc/iscsi/iscsid.conf
Enable the automatic startup.
node.startup = automatic
Enable and configure authentication settings.
node.session.auth.authmethod = CHAP
node.session.auth.username = username
node.session.auth.password = password
Restart the iSCSI service.
# sudo systemctl restart iscsid open-iscsi
Discovery and login to target
Run the following command to discover the iSCSI Target. The configured iSCSI Target iqn.2000-01.com.lab:NAS-DS918BCK.Target01 has been discovered successfully (in the example, two iSCSI Targets have been discovered).
# sudo iscsiadm -m discovery -t sendtargets -p 192.168.10.31
Now login to the target.
# sudo iscsiadm --mode node --targetname iqn.2000-01.com.lab:NAS-DS918BCK.Target01 --portal 192.168.10.31 --login
Check if the connection has been established to the storage device.
# sudo iscsiadm -m session -o show
Create a new partition and file system
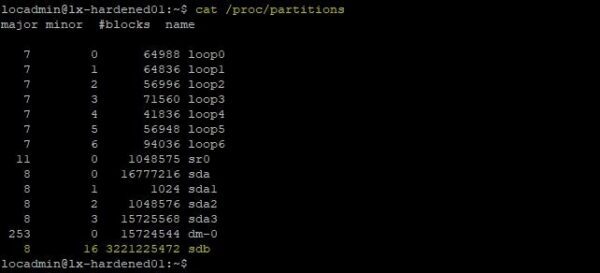
After connecting the iSCSI disk, check the configured partitions in Ubuntu. A new disk sdb is displayed.
# cat /proc/partitions
Retrieve the list of installed disks in Ubuntu to identify the disk used as repository.
# sudo fdisk -l
Since the partition to create is bigger than 2 TB, it is necessary to configure a GPT partition.
# sudo parted /dev/sdb mklabel gpt
Now create the partition using the entire disk formatted XFS.
# sudo parted -a opt /dev/sdb mkpart primary xfs 0% 100%
To check the just created partition, run the command:
# lsblk
Check the installed disks once again. Now the new /dev/sdb1 partition is displayed.
# sudo fdisk -l
To leverage the Fast-Clone technology in Veeam Backup & Replication, we need to enable reflink and CRC formatting the partition with the following command:
# sudo mkfs.xfs -b size=4096 -m reflink=1,crc=1 /dev/sdb1 -f -K
Mount the file system
Once the partition has been formatted, we mount the file system for use.
If you want to mount the partition under /mnt/veeamrepo, create the directory using mkdir.
# sudo mkdir -p /mnt/veeamrepo
Mount the file system with the command:
# sudo mount -o defaults /dev/sdb1 /mnt/veeamrepo
Run the following command to check the file system:
# df -Th
Now retrieve the UUID of the new partition to be configured in the /etc/fstab file.
# sudo blkid /dev/sdb1
Update the /etc/fstab file with the new UUID to mount the filesystem automatically each time the server boots.
# sudo vi /etc/fstab
UUID=88d1bd31-1996-4545-9e5a-2b410364f13a /mnt/veeamrepo xfs _netdev 0 0
Adding the value _netdev, the mount point will be mounted only after the network starts correctly.
Restart the server and make sure the iSCSI LUN is mapped after booting.
# sudo reboot
# df -Th
Create the Veeam user
You need to create a dedicated Veeam user with the correct permissions so that the Veeam Transport Service has the correct rights to the Veeam mount.
Create a new account and create the password.
# sudo useradd locveeam --create-home -s /bin/bash
# sudo passwd locveeam
To install the required Veeam components, we need to temporarily assign the just created user to the sudo group to execute the commands as root.
# sudo usermod -a -G sudo locveeam
Assign permissions to the mount point
Assign permissions to access the /mnt/veeamrepo folder to the locveeam account and check assigned permissions.
# sudo chown -R locveeam:locveeam /mnt/veeamrepo/
# sudo chmod 700 /mnt/veeamrepo
# ll /mnt
Test the Hardened Repository
Assigned the correct permissions, it's time to test the Hardened Repository using iSCSI.
1. Create the new Hardened Repository using iSCSI in Veeam
Open the Veeam Backup & Replication console and configure the new Hardened Repository (follow this step-by-step procedure).
2. Create a Backup Job
Create a Backup Job specifying the just created Hardened Repository to store the backup (follow this step-by-step procedure).
3. Run the Backup Job
Run the Backup Job.
4. Check Immutability
Try to delete the just created backup to test if the backup is immutable. As expected the backup can't be deleted due to its immutability status.
Secure the Hardeneded Repository
Once the configuration and backup tests have been successfully completed, the Hardened Repository using iSCSI must be secured to avoid unauthorized accesses:
- Make sure the Veeam user (locveeam in the example) is not a member of the sudo group.
- Unplug the Remote Server Management system (iDRAC, iLO, etc.) from the network.
- Disable SSH access to the repository with the commands:
# sudo systemctl disable ssh.service
# sudo systemctl stop ssh.service
Because the Linux machine runs in the virtual infrastructure, also the the access to the virtual environment must be secured.
The configuration of the Linux Hardened Repository using iSCSI is now complete and the system is ready to use.


Excellent update. As a systems engineer in the field, I consistently monitor your website for new updates, which invariably prove beneficial.
Excellent instruction!