Altaro released Altaro VM Backup 7.5, the virtual backup solution for VMware vSphere and Microsoft Hyper-V introducing the support for backup to Azure.
Backup to Azure feature is available only in the Altaro VM Backup Unlimited Plus edition and a pricing comparison can be found in the dedicated Altaro website page.
What's new in version 7.5
In addition to local disk, network path or an Altaro Offsite Server, Altaro VM Backup can now store Backup Copy in Azure.
The main benefits introduced in version 7.5 are the following:
- Administrators can use Azure Block Blob storage which is the most cost effective Azure storage option
- Backups can be restored from Azure to different Altaro VM Backup installations
- Supports Altaro's compression, encryption and industry best deduplication
- No additional VM has to be deployed in Azure
Configure a Backup Copy to Azure
To take a Backup Copy to Azure you need to setup the Azure environment and to configure an Offsite Backup Location in VM Backup.
Setup Azure environment
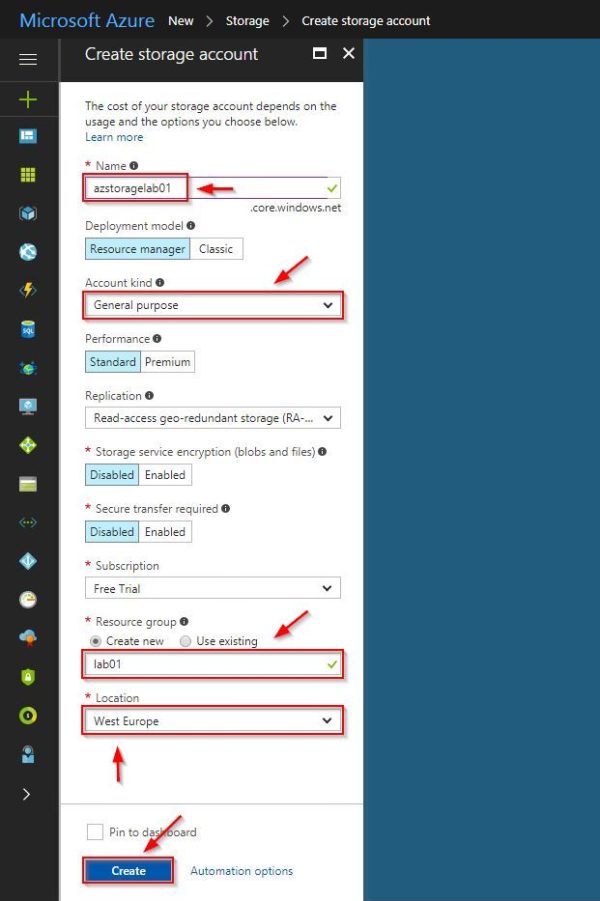
To store backup in Azure, you need to create a Storage Account. To create a storage account, access the Azure portal and insert your credentials to login.
From the Dashboard, click on New > Storage option and select Storage account - blob, file, table, queue as featured app.
Enter a Name, specify General purpose as Account kind and create a Resource Group. Select the Location to use then click Create.
Access the new created Storage Account and select Access Keys under Settings. This value is needed by Altaro to access the Azure's storage account.
Configure Altaro's Offsite Location
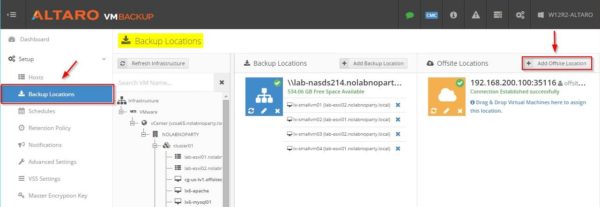
Open the Altaro application and go to Backup Location tab. In the right side click on Add Offsite Location button.
Select Cloud Backup to an Azure Storage Account option then click Next.
Enter the Azure Storage Account connection string and click Test Connection.
When the test connection is successful, click Finish to save the configuration.
The new Azure Offsite Location has been created.
Create a Backup Copy to Azure
To create a Backup Copy to Azure, assign the VMs you want to backup offsite to the just created Azure offsite location.
Go to Take Offsite Copy tab and select the VMs you want to process. Click on Take Offsite Copy button to start the task. Keep in mind that a full backup must be available before taking an offsite copy.
The VMs are processed and copied to Azure.
Depending on the size of your VMs, after some minutes the copy task completes showing the result of the process.
From Azure Dashboard, select All Resources > Storage Account's name > Blob Service to find the backed up virtual machines.
A Backup Copy of your VMs are now stored in Azure and available in case of need.


