
To add an extra layer of security for the external accesses to VMware Horizon infrastructure, login procedure must be enforced with a multi-factor authentication (MFA) solution, such as Azure MFA.
In the market there are several solutions that provide MFA, but Azure MFA is becoming popular since the majority of companies leverages Office 365 services.
To take benefit of MFA in Azure, it is required the license Azure AD Premium P1 and Premium P2 or Enterprise Mobility + Security that include the Azure AD Multi-Factor Authentication service.
Configure the Azure environment
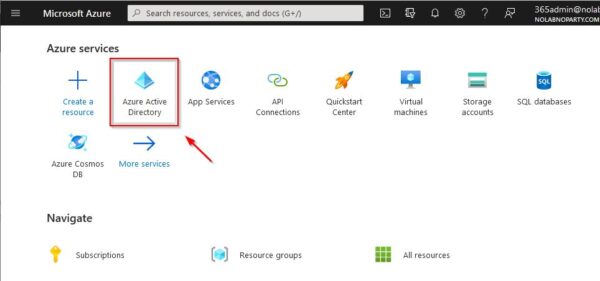
Login to your Azure portal using a global administrator account.
Click on Azure Active Directory icon.
In the homepage under Overview, write down your Tenant ID.
To enable MFA, security defaults must be disabled. Go to Properties area and click the Manage Security defaults link.
Select No in the Enable Security Default selector.
Now go back to the homepage and select Security.
Select Conditional Access.
Click New policy to add a new policy.
Enter a Name for the new policy then click 0 users and groups selected to add the users/groups to configure.
Select option Select users and groups and enable the Users and groups checkbox. From the list on the right, select users and groups to add then click Select.
Once the selection has been completed, click on 0 controls selected link.
Select Grant access and check the Require multi-factor authentication option. Enable also the Require one of the selected controls option then click Select.
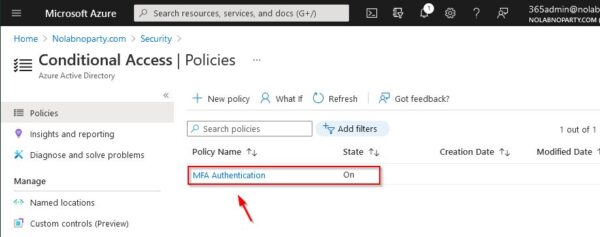
Select On in the Enable policy selector and click Create.
The created policy.
Install the NPS Server
Deploy a Windows Server 2016/2019 and join the server to the Active Directory domain (you can also use an existing server in your network). Open the Server Manager and click Add roles and features.
Click Next.
Select Role-based or feature-based installation and click Next.
Select Network Policy and Access Services. Automatically the Add Roles and Features wizard is displayed. Click Add Features.
Make sure Network Policy and Access Services is selected then click Next.
Click Next.
Again click Next.
Enable Restart the destination server automatically if required and click Yes to confirm.
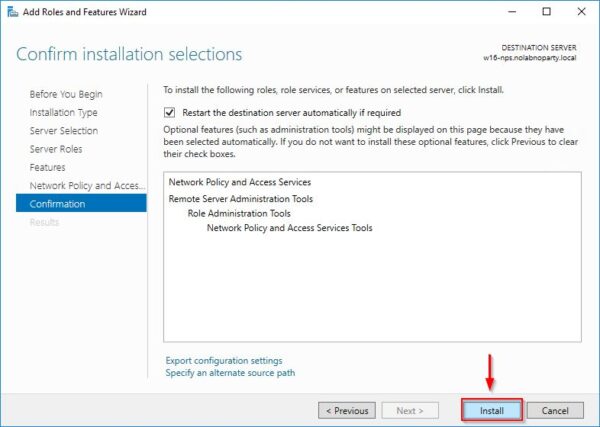
Click Install to proceed with NPS installation.
The NPS role is being installed. The server will reboot automatically.
Once the server has been rebooted, click Close to exit the wizard.
Open the Network Policy Server console and right click NPS (local) item. Select Register server in Active Directory.
Click OK to authorize.
Click OK.
The NPS server must be able to communicate with the following URLs over ports 80 and 443:
- https://adnotifications.windowsazure.com
- https://login.microsoftonline.com
- https://credentials.azure.com
To complete the setup using the PowerShell script, the connectivity to the following URLs is also required:
- https://login.microsoftonline.com
- https://provisioningapi.microsoftonline.com
- https://aadcdn.msauth.net
- https://www.powershellgallery.com
- https://aadcdn.msftauthimages.net
Install the NPS extension for Azure MFA
Download the NPS Extension for Azure MFA from the Microsoft Download Center and copy it to the NPS server.
Run setup.exe to install the NPS extension. Accept the EULA and click Install.
The Azure MFA extension is being installed.
When the process has been completed, click Close.
To complete the installation, you must run the PowerShell Script located in the folder C:\Program Files\Microsoft\AzureMfa\Config. The script performs the following:
- Creates a self-signed certificate.
- Associates the public key of the certificate to the service principal on Azure AD.
- Stores the certificate in the local machine certificate store.
- Grants access to the certificate's private key to Network User.
- Restarts the NPS service.
Open the Windows PowerShell as an Administrator and change the directory to C:\Program Files\Microsoft\AzureMfa\Config.
PS C:\> cd "C:\Program Files\Microsoft\AzureMfa\Config"
To run the PowerShell script, the protocol TLS 1.2 must be enabled.
PS C:\> [Net.ServicePointManager]::SecurityProtocol = [Net.SecurityProtocolType]::Tls12
Run the script and allow the installation of required modules.
PS C:\> .\AzureMfaNpsExtnConfigSetup.ps1
When you are prompted to insert the administrator credentials, enter the correct account then click Next.
Enter the password and click Sign in.
Enter the Tenant ID and press Enter.
When the configuration has been completed press Enter.
Configure the RADIUS client in NPS
Once the Azure MFA extension has been installed successfully, open the NPS console, right click RADIUS Client under RADIUS Clients and Servers and select New.
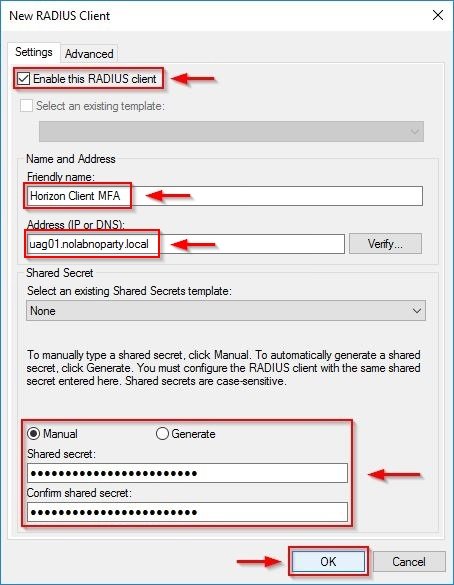
Check the Enabled this RADIUS client option. Enter a Friendly Name for the RADIUS client and the Address (IP or DNS) of your UAG. Enter a Shared secret then click OK.
The created RADIUS client policy.
Access the Policies > Network Policies section. Right click the Connections to other access servers policy and select Duplicate Policy.
Right click the just created copy and select Properties.
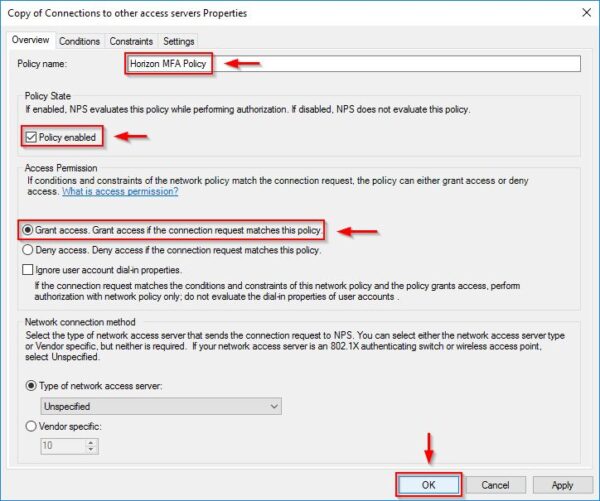
Enter the Policy name, check the Policy enable and select Grant access option. Click OK.
The new created policy.
Configure the Authenticator
Install from Apple or Android store the appropriate Microsoft Authenticator version for your mobile phone.
Create the account on the Microsoft Authenticator. You may need to connect to https://aka.ms/npsmfa to configure the MFA device associated to the selected account.
Configure the Horizon UAG
From your preferred browser, access the login page of your UAG, enter the admin credentials and click Login.
Click Select to access the configuration page.
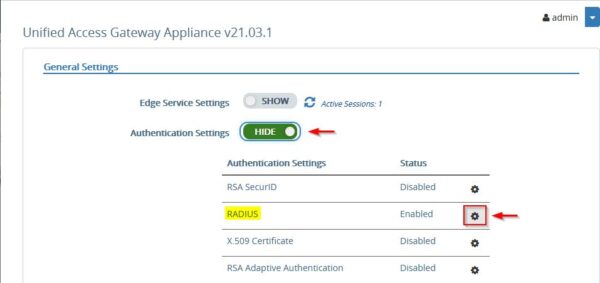
Click Show in Authentication Settings.
Access the RADIUS configuration page by clicking the corresponding Settings icon.
Enable the RADIUS protocol, set Authentication Type as MSCHAP2 and enter the RADIUS Server Host name previously configured. Click Save.
Test MFA
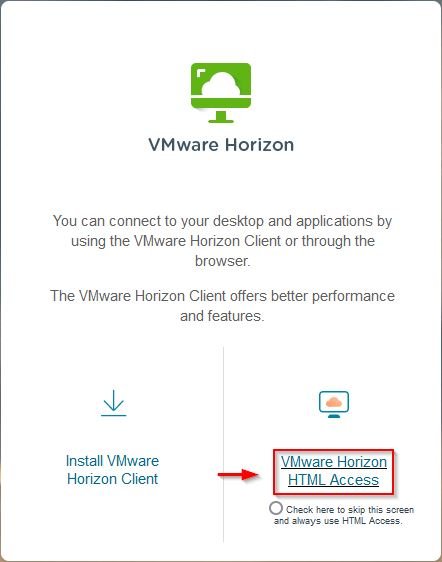
In your preferred browser enter the Public DNS name to connect your Horizon infrastructure then select the preferred access mode.
Enter the credentials of the AD user configured to use MFA and click Login.
You must approve the sign-in from your Microsoft Authenticator to allow the user to login. Click Approve.
The user has been authorized to access the entitled Horizon Dektop Pools and/or Applications.
Providing Azure MFA capability to VMware Horizon logins is de facto the standard applied to new virtual desktop infrastructures.















Hi,
Thanks for this tutorial , really useful.
If i can ask you a question please : in context of hybrid join and windows 10 subscription, i am not able to have a fullfill scheme working.
My user can login to horizon public url, and after that can log to vm but windows 10 not activate to enterprise and my desktop apps ask for mfa again (teams and alos office 365 desktop apps)
i try many scheme :
- NPS with or without TrueSSO
- with a vmware server enrollement, with saml (again with or wothout SSO)
It seems windows 10 subscription and SSO not working in hybrid join devices when MFA (of microsoft) is used.
Many forum and blog have quit this method due to unavailable and unusefull support from Microsoft on this subject.
Have you experienced this ?