Altaro released VM Backup 7.0 backup solution introducing the support for Windows Server 2016 and the Augmented Inline Deduplication technology.
New features include also the Boot VM from Backup capability where VMs can now be booted directly from the backup repository reducing the service downtime.
VM Explorer is available as 30-day trial and can be downloaded from Altaro's website. A free version is available and support up to two VMs.
What's new
Windows Server 2016 support
Added the support for Microsoft Windows Server 2016.
Augmented Inline Deduplication
This new feature dramatically improves backup and restore speed creating the smallest backup size lowering storage requirements. Augmented Inline deduplication runs across all backup jobs, and no need to post processing VMs. Efficiency increases as more VM backups are added.
Enable Deduplication
To activate deduplication, from the Altaro's Dashboard click the setting icon on the right side or access the Advanced Settings section.
In the Deduplication column, check the VMs you want to enable deduplication then click Save Changes at the bottom of the screen.
Selected VMs needs a full backup to enable deduplication leaving previous backups available for restore in the Backup Location. Click Proceed to confirm selection.
When the backup jobs have been completed, in the Dashboard are displayed the stats related to Deduplication & Compression.
Faster compression algorithms
New release uses now compression algorithms that leverage processors' multithreading and arithmetic abilities to give a boost to the backup speed and drastically lowers the CPU requirements of the backup process.
Boot VM from Backup
VMs can now be booted directly from the Backup Location without affecting backup integrity. The VM is restored in background to the Hypervisor including any new changes made to the booted VM.
To commit changes you can simply switch over to the recovered VM. This feature minimize downtime because there is no need to wait for the entire VM to restore.
Boot a VM from Backup
From the Dashboard, access the Boot From Backup section and click on Boot a VM from Backup button.
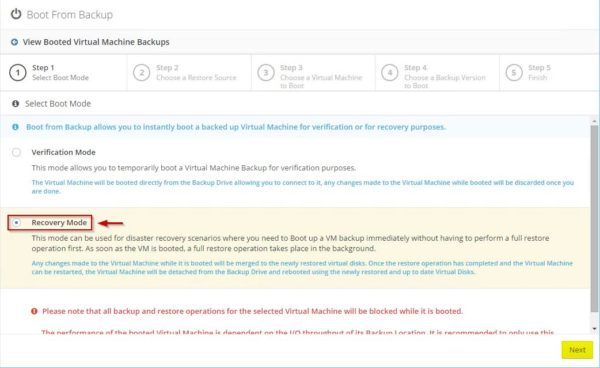
This new feature allows to boot a VM directly from the backup repository for verification or for recovery purposes. Two options are available:
- Verification Mode - changes made on the booted VM are discarded when done
- Recovery Mode - changes made on the booted VM can be committed to production
Select Recovery Mode to proceed with recovery. Keep in mind that slow Backup Location will affect the performance of booted VMs.
Choose the Restore Location and click Next.
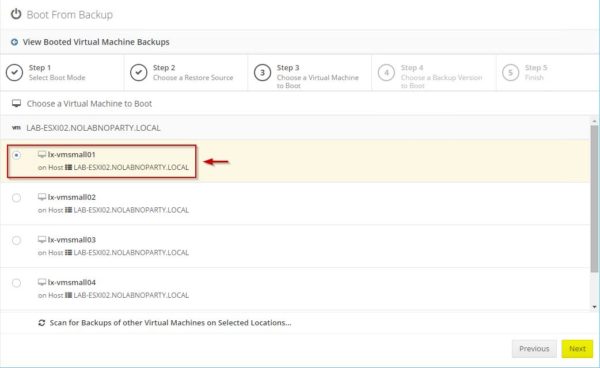
Select the VM to boot and click Next.
Specify the RPO, VM's name, Hypervisor and datastore to use then click Boot. It is recommended to Disable network card to avoid IP conflicts.
Click View Booted Virtual Machine Backup to monitor progress.
The VM is being booted.
When the VM has been booted successfully, you have three options available:
- Finalize VM Recovery - commit changes to the booted VM
- Discard VM - discard changes made
- Connect - connect the VM
New look for Altaro’s Offsite Backup Server
The Backup Server has been completely redeveloped with a brand-new look to make the management of your offsite backups easier.
The new Altaro's Offsite Server Dashboard.
Upgrade VM Backup
Before proceeding with the upgrade, you have to uninstall previous release to avoid the warning message. All settings are retained.
Double click on the downloaded setup file to run the installer. Click Next.
Accept the EULA then click Next.
Leave default folder and click Next.
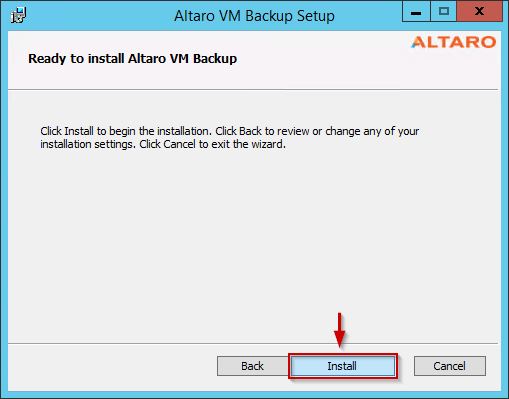
Click Install to begin the installation.
VM Backup is being installed.
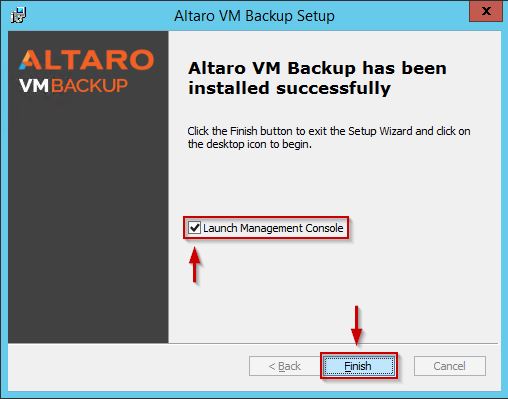
Enable Launch Management Console and click Finish o exit the wizard.
Select This Machine and click Connect.
VM Backup 7.0 requires a new license key. Enter the new license key received from Altaro and click Assign License Key.
The new release has been installed successfully.
Check out this blog series to configure and use Altaro VM Backup to protect your virtual infrastructure.


