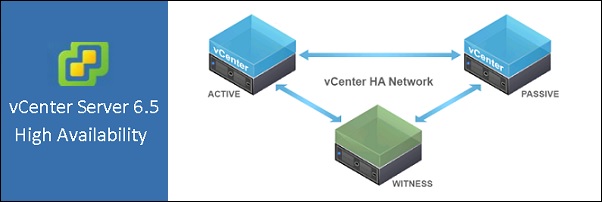
vCenter High Availability (VCHA) is a features introduced in VMware vSphere 6.5 that eliminates the single point of failure of vCenter and is available for the VCSA 6.5 only.
To implement a VCHA cluster, only a single vCenter license (standard license is sufficient) is required. VCHA supports both external PSC (vCenter Server and PSC resides on different VMs) and embedded PSC (vCenter Server and PSC are on the same VM) deployment models.
Blog Series
VMware vCenter High Availability: setup - pt.1
VMware vCenter High Availability: maintenance and test failover - pt.2
vCenter Server HA architecture
The vCenter HA architecture includes three nodes:
- Active Node - runs the active instance of vCenter Server serving the client requests.
- Passive Node - runs as the passive instance of vCenter Server and constantly receives state updates from the Active node in synchronous mode. Take the role of Active node in the event of failure.
- Witness Node - is a light-weight VM that serves as a quorum node and does not take over of Active/Passive nodes.
Although traditional architectures uses shared storage to solve the split-brain problem, that is data/availability inconsistencies due to network failures within distributed systems maintaining replicated data, the VCHA design does not assume the use of a shared storage–based deployment in order to support VCHA cluster spanning multiple datacenters. Three different datastores must be used to store the three VMs and each node should reside on a different host as well. At least 3 hosts are required to complete the deployment.
A good network connectivity is required between Active and Passive node to guarantee zero RPO then a dedicated network separated from the management network must be configured. Clients have access to the VCSA via the management network interface.
In the event of the Active vCenter Server failing, the VCSA works as follow:
- Active node fails: until Passive and Witness node can communicate with each other, the Passive node will take over the Active role and starts serving client requests.
- Passive node fails: if Active and Witness node can communicate with each other, the Active node will continue to server client requests.
- Witness node fails: as long as the Active and Passive node can communicate with each other, the Active node will continue to serve client requests.
- More than one node fails: all three nodes cannot communicate with each other, the cluster is assumed non-functional causing the vCenter Server services disruption.
- Isolated node behavior: if a node gets isolated from the cluster, it is automatically taken out of the cluster and all services are stopped. For example, if an Active node is isolated, all services are stopped to ensure that the Passive node can take over as long as it is connected to the Witness node.
Configure the HA network
Before proceeding with the VCHA deployment, we need to create a new network since the VCHA cluster requires an isolated network for the nodes communication.
From vSphere Web Client, select the first host in the cluster then go to Configure tab. Select Virtual switches section in order to configure network settings.
Click Add host network icon to configure the HA network.
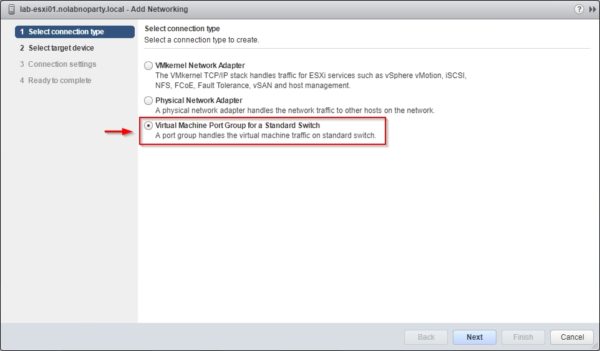
Select Virtual Port Group for a Standard Switch as connection type then click Next.
Thick Select an existing standard switch option and click Browse to select the vSwicth to use. Click Next.
Enter a Network label and optionally a VLAN ID. Click Next to continue.
Click Finish to create the new Port Group.
The HA Port Group has been created.
Now repeat same steps for all other hosts members of the cluster.
Deploy vCenter HA with the embedded PSC
Once the HA network is ready, we can proceed with the vCenter High Availability configuration.
The VCHA cluster can be deployed in two ways:
- Basic – suitable for medium small businesses, the wizard takes care of active/passive/witness nodes creation as well as vNIC interfaces. Minimum info are requested by the system, such as IP address. If you have a DRS cluster, VMs placement is done automatically. Keep in mind this deployment method requires an already configured HA network.
- Advanced – a more complex setup is needed but provides flexibility to the design (a VM can be placed in a different datacenter or SSO domain for example). The three nodes active/passive/witness must be manually created providing the required network information.
From vSphere Web Client, right click the vCenter Server and select vCenter HA Settings option.
In the vCenter HA section click Configure button to begin the VCHA deployment.
Select Basic deployment method and click Next.
Specify the IP address and subnet mask for the Active node, click Browse and select the vCenter HA network previously configured. Click Next.
Specify the IP address for the Passive and Witness nodes then click Next.
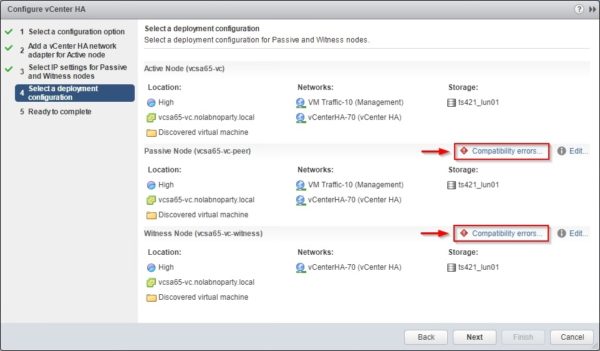
In the deployment configuration window if VCHA requisites are not met, Passive and Witness nodes may display an error. Click the Compatibility errors link to check what's wrong.
The error occurs because Passive and Witness nodes must be located on different hosts and storage devices. Click Close to close the window.
To fix the problem, click Edit next to the Passive node's error message.
Enter a name for the virtual machine or leave the default, select the location and click Next.
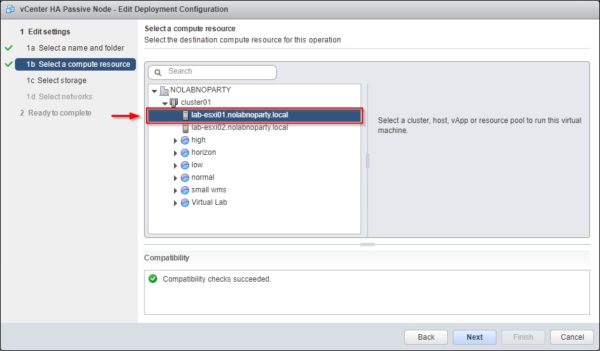
Select the ESXi host to use and click Next once the compatibility checks succeed.
Since Datastore clusters are not supported by vCenter HA deployment, select a standalone storage not member of any cluster and click Next.
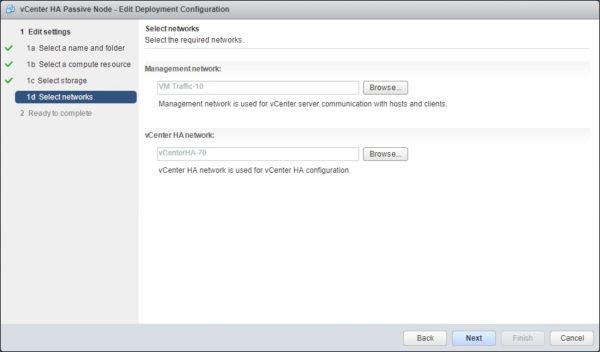
Specify networks used for the management and HA then click Next to continue.
In the configuration summary, click Finish to complete the configuration of the Passive node. Note that the procedure to create the Passive node will perform a clone of the current VM.
The Passive node is now marked as compatible. Proceed with the Witness node by clicking the corrisponding Edit link.
Repeat same procedure as done for the Passive node. Note that you have to specify only the HA network for the Witness node.
When the configuration has completed, also the Witness node is marked as compatible. Click Next to complete the deployment.
When the configuration settings have been verified, click Finish to proceed with the deployment.
If you are deploying the VCHA nodes in less than three hosts you receive an error. As pre-requisite you must have at least three hosts to deploy VCHA.
As a workaround, this post published on virtuallyGhetto.com blog explains you can disable the DRS Anti affinity rule that blocks the deployment by editing a parameter in the vCenter Server.
From the vCenter Server go to Configure tab and select Advanced Settings. Click the Edit button to modify the requested parameter. In the search box, type the word vcha to quickly locate the parameter to modify.
Select the parameter config.vpxd.vcha.drsAntiAffinity and replace the value true with false then click OK to confirm. Although this setup allows the deployment of the VCHA nodes in two hosts, this configuration should be used in LAB environment only and not in production.
After disabling the DRS Anti-Affinity rule, the deployment of the VCHA nodes succeed.
After some minutes, the deployment of the Passive and Witness nodes is complete. In the Summary tab you can find the vCenter HA widget which indicates the status of the cluster.
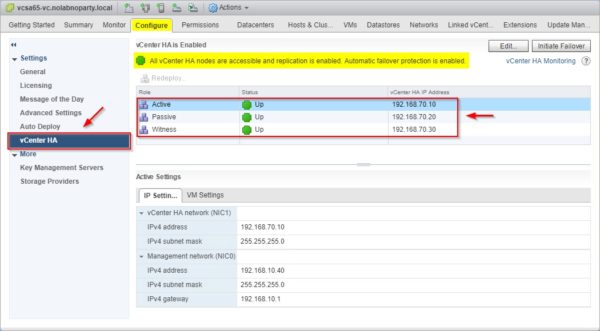
In Configure tab selecting the item vCenter HA you can see the status of the three nodes.
Deploy vCenter HA with an external PSC
To deploy an HA cluster with an external PSC, you will need at least two PSC instances behind a load balancer.
The configuration of the HA network and the deployment of VCHA nodes have been completed successfully. Part 2 will show how to manage the VCHA nodes testing the failover.













Nice Explanation. Thanks allot