To reduce the network traffic generated by the initial synchronization, vSphere Replication provides the seeding capability to limit the data to transfer.
This option allows to quickly perform the initial replication without transferring the entire virtual machine to the target datastore. This allows to reduce the required time to complete the task and limit the data to transfer especially if the network is busy or if the available bandwidth is poor.
Blog series
vSphere Replication 8.x deployment - pt.1
vSphere Replication 8.x failover - pt.2
vSphere Replication 8.x traffic isolation - pt.3
vSphere Replication 8.x seeding - pt.4
How vSphere Replication seeding works
To reduce the initial replication data transferred over the network, virtual disk files of VMs to replicate can be copied in the target datastore and used as replication seeds when the replication job is configured.
During the replication procedure, vSphere Replication compares differences occurred on the source and target site replicating only the changed blocks.
When the replication job is configured a target datastore must be specified to store the replicated VM. When the target datastore has been selected, the system checks if a disk with the same filename already exists in the datastore. If the same filename is found, you have the option to use the existing disk file as a seed for the replication. If this option is selected, a new page is available in the wizard where seeds for each disk of the VM can be specified. The result you can obtain is the reduction of the network traffic since only changed blocks will be replicated.
If you don't want to use the seed option, replica files are placed in a new directory with a unique name.
Configure vSphere Replication seeding
The seeding process is composed by three main steps:
- Download source VMDK files
- Upload VMDK files to target site
- Configure the replication job
Download source VMDK files
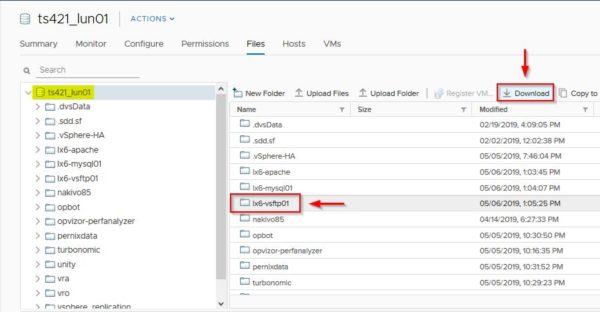
Access the datastore where the source virtual machine is stored and locate the VM folder. Select the correct folder and click Download from the available options to download the VMDK files on the local computer. To download these files, the source virtual machine must be powered off first.
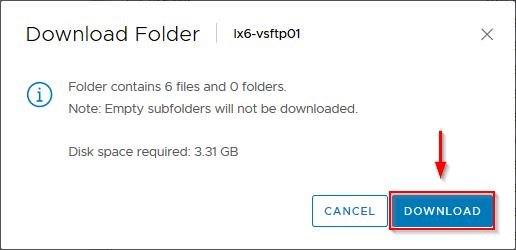
Click Download to confirm.
A ZIP file containing the source VMDK files is created in the chosen location.
Upload VMDK files to target Site
In the target Site, access the Storage area and select the datastore where the VM files should be copied. Click Datastore browser.
When the target datastore has been selected, click Create directory. Enter a Directory name and click on Create directory button.
Click Upload to copy the VM files to the just created new directory. A the end of the upload process, all source VM files are stored in the selected datastore.
Configure the replication job
Once the VM files have been copied to the target datastore, in vSphere Client right click the VM to replicate and select All Site Recovery actions > Configure Replication. The Configure Replication wizard is displayed showing the VM validation status that indicates if the selected VM can be configured for replication. Click Next.
Specify the Target Site and the vSphere Replication server then click Next.
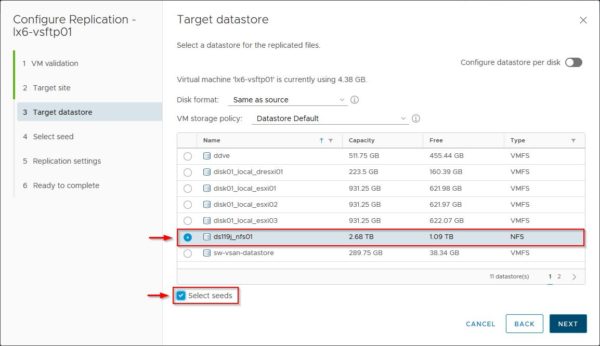
Specify the Target datastore to use and enable the Select seeds option. Click Next.
In the Select seed section, click the Seed drop-down menu and select Browse to locate the source VMDK files.
Access the folder containing the source VM files previously copied and select the corrisponding hard disk (VMDK file) you want to seed. Note the reported source VMDK file size is 16 GB.
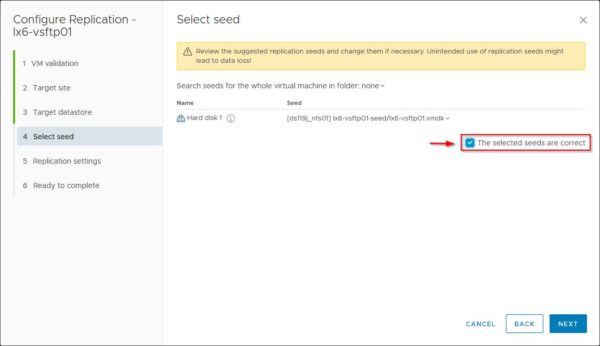
Once the appropriated hard disk has been selected, enable The selected seeds are correct option to confirm that the selection is correct.
The selected seeds are correct option is mandatory to continue the configuration. If not checked, an error message is displayed.
Specify the RPO for the replica then click Next.
Review the selected settings then click Finish to save the configuration and start the replica.
The initial synchronization is being performed.
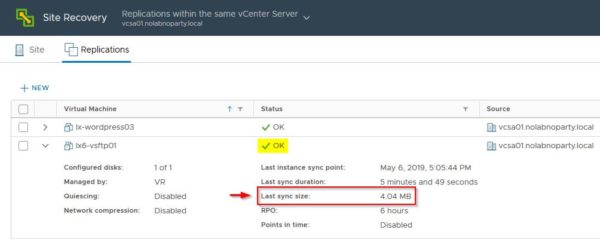
When the replication has been completed successfully, you can notice the transferred data are only few MB instead of the full size of the VM (the source VMDK file is 16 GB). It means the replication seed worked as expected transferring only the changes occurred in the virtual machine from the initial copy.
Using the replication seeds, the used bandwidth and the time required are very limited providing the big benefits of keeping the network performance unaltered and saving time.


