In vSphere Replication a network isolation design may be required to split the traffic from the management network (used by default to transfer data) to avoid network performance issues.
If the traffic is not isolated, during the replication process the appliance consume the management network limiting the available bandwidth to other applications affecting the overall performance.To optimize the traffic, vSphere Replication can be configured to split the traffic from the source host to the appliance and from the appliance to the target host.
Blog series
vSphere Replication 8.x deployment - pt.1
vSphere Replication 8.x failover - pt.2
vSphere Replication 8.x traffic isolation - pt.3
vSphere Replication 8.x seeding - pt.4
Traffic isolation topologies
To replicate VMs from the production to DR Site, there are different topologies that can be adopted:
- Single vCenter Server
- Multiple vCenter Servers
In a situation with budget constraints, the single vCenter Server approach could be a good compromise.
In addition to the typical scenario with a DR Site, vSphere Replication can be also used to migrate VMs from a data center to another one.
Setup source hosts
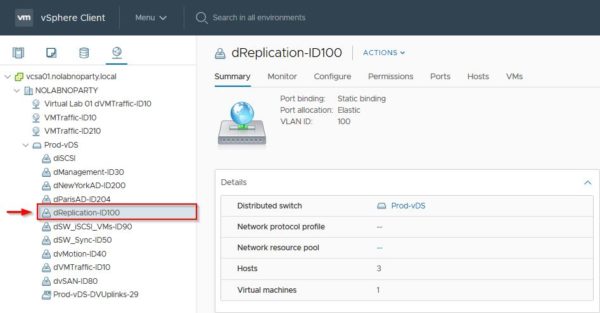
First step of the configuration is the creation of a dedicated port group in the source hosts network. In the example a distributed switch is used in the network configuration. If a vStandard Switch (vSS) is used instead, the concept is the same and also in this case you should create a new port group.
Create a new Port Group
Right click the Distributed Switch to use and select Add new Port Group. When the New Port Group configuraton has been completed, you will find the new Port Group in the Distributed Switch.
Create a new VMKernel
In order to separate the Replication traffic, a new VMKernel adapter should be created in the source hosts. Select the first source host of the cluster and go to Configure tab. Select VMkernel adapters item under Networking and click Add Networking.
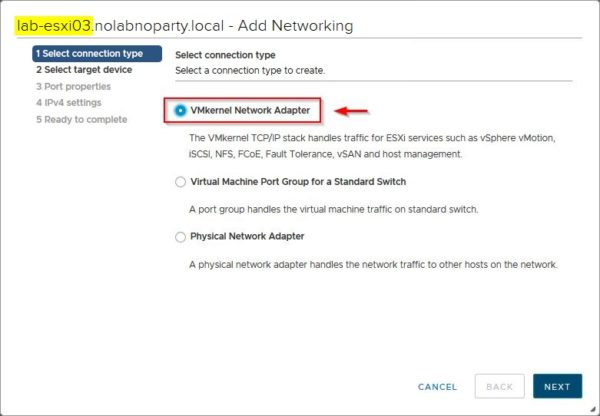
Select VMkernel Network Adapter option and click Next.
Since a Distributed Switch is used, choose Select an existing network option and select the previously created Port Group throught the Browse button. Click Next.
Select vSphere Replication as service to enable in the host then click Next.
In the IPv4 Settings, select Use static IPv4 settings option to assign an IP address to the VMkernel. Specify the Port address and the Subnet mask (192.168.100.10/24 in the example) then click Next.
Click Finish to create the new VMkernel adapter.
The new VMkernel adapter has been created successfully.
Now create a new VMkernel in the second source host member of the cluster by following the same procedure. In the example the VMkernel is configured with address 192.168.100.20/24.
Again, also for the third source host member of cluster, create a new VMkernel adapter. The VMkernel is configured with address 192.168.100.30/24.
All host members of the cluster have been configured with a new VMkernel adapter configured with the required parameters.
Setup target host
Also in the target host a new VMkernel adapter must be created to separate the traffic from the management network. Access the Networking area and select the VMkernel tab. Click Add networking to create a new VMkernel. In the configuration wizard select VMkernel Network Adapter option and click Next.
Because in the example the target host uses Standard Switches, choose Select an existing standard switch and select the switch to use through the Browse button. Click Next.
Specify the Network label and the VLAN ID used. Enable the vSphere Replication NFC service and click Next. The Network File Copy (NFC) is used to receive the replication data from the source host.
Specify the IPv4 address and the Subnet mask for the VMkernel and click Next. The VMkernel is configured with address 192.168.101.50/24.
Click Finish to create the new VMkernel adapter.
The VMkernel has been created successfully in the target host.
Configure vSphere Replication NICs
Once the VMKernel adapters have been created, the appliance's network must be configured accordingly. In order to split the traffic from the management network, we need to add two additional NICs to the VM. Right click the vSphere Replication appliance and select Edit settings.
Click Yes to continue.
Click Add New Device and select Network Adapter.
Assign the New Network adapter to the network created to transfer data from source host to the appliance.
Enable the Connect option to connect the new NIC to the appliance.
Add a second Network Adapter that must be connected to the network used to transfer data from the appliance to the target host. Ensure the NIC has the option Connected enabled and click OK.
Configure vSphere Replication network
In order to re-direct the traffic to source and target hosts, you need to assign the correct networks to the appliance and a static route may be required if the source/target network is not properly routed.
Right click the appliance and select Power > Power On.
Click Yes to continue.
From the preferred browser, access the appliance GUI by entering the address https://IP_appliance:5480. Enter Username and Password then click Login.
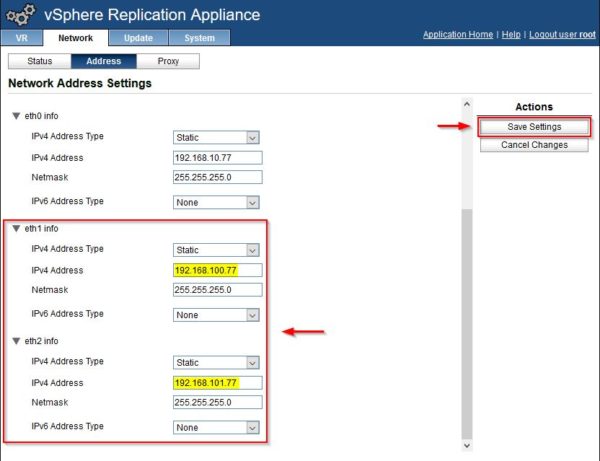
Go to Network > Adapters area and specify the network parameters for the two added NICs:
- eth1: incoming traffic (from source host to appliance)
- eth2: outgoing traffic (from appliance to target host)
Click Save Settings when done.
Go to VR > Configuration area and enter the IP address assigned to the eth1 network adapter in the IP address for Incoming Storage Traffic field. This tells the system incoming traffic (from source host) will arrive on eth1. Click Apply Network Settings to save the configuration.
The configuration has been applied successfully.
Add a static route
If the appliance can't reach source o destination network (it depends where the appliance is placed), you need to add a static route. To add a static route to the vSphere Replication, you need to SSH the appliance. By default SSH service is disabled and you need to enable SSH on the vRA.
Access the vSphere Replication's console via vSphere Client and login as root.
From the console, run the following command to enable the SSH service in the appliance:
# /usr/bin/enable-sshd.sh
Add the route details in the file below to make the change persistent across reboots.
# vi /etc/systemd/network/10-eth2.network
Add a new section at the end of the file and add the following route details:
[Route]
Gateway=192.168.210.1
Destination=192.168.210.0/24
Restart network services to enable the changes.
# systemctl restart systemd-networkd
Check if the configuration has been applied in the routing table running the command:
# netstat -r
The static route has been added successfully.
Check appliance's network
To verify the appliance is reachable from the source host and the traget host, the vmkping command is what we need.
SSH the source host and run this command to check if the source host is able to reach the vSphere Replication appliance:
vmkping -I <VMkernel_assigned_to_replication> <IP_Address_vSphere_Replication_appliance>
# vmkping -I vmk5 192.168.100.77
Now run the following command to verify if the target host can reach the appliance:
# vmkping -I vmk2 192.168.101.77
If a static route has been added, use the ping command from the appliance to test the connectivity to target host:
# ping 192.168.101.50
Source, target hosts and appliance networks are configured properly.
Configure NIOC on the Distributed Switch
To limit/provide the bandwidth assigned for replication, you can use the NIOC feature available for Distributed Switches and configure the appropriate Shares Value.
Run the replication job with traffic isolated
Once the traffic isolation has been configured, run a replication job to check if everything works as expected. A successfully result confirms the replication is working properly and data are transferred over a dedicated network without affecting the production network.
Traffic isolation should be the correct approach to use if the replication process affects the production network performance. Part 4 will cover the seeding procedure to reduce transferred data over the network and time required to complete the process.


Hello, thanks much for the great article. I am setting this up now and almost there. Cheers!
Do I understand correctly that with this configuration, replication works in one direction only?
Is it possible to put both services on one vmkernel? (vsphere Replication and vsphere Replication NFC)
Yes, you have to configure the replication in the opposite way to take benefit of bidirectional replication. To keep traffic separated, you need a dedicated vmkernel for each protocol used (replication and NFC).