To install Nakivo on Hyper-V, you can choose either the supported Windows or Linux platforms based on your business requirements.
Installing Nakivo on a Linux-based virtual machine (Ubuntu Server 24.04 LTS in this example) allows you to save a Windows license, as the product provides the same features.
Create a new Virtual Machine
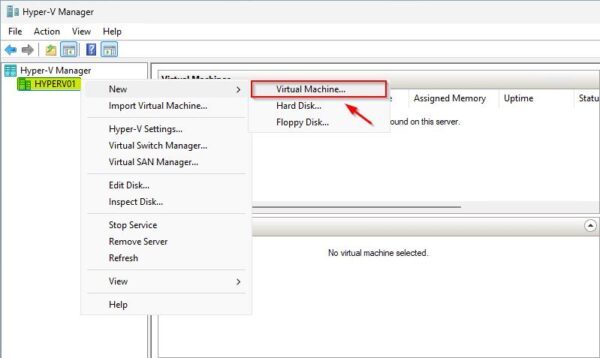
Login to your Hyper-V node and open the Hyper-V Manager. Right click the node name and select New > Virtual Machine.
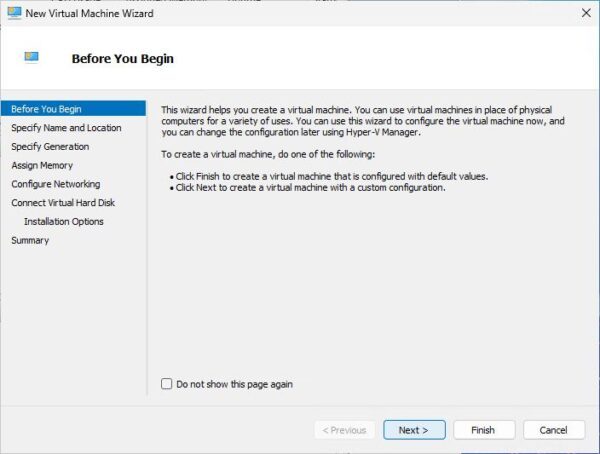
Click Next.
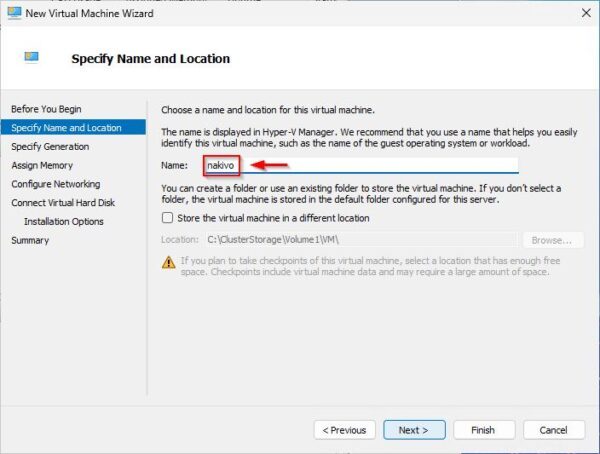
Type the virtual machine Name and click Next.
Select Generation 2 as the machine generation type.
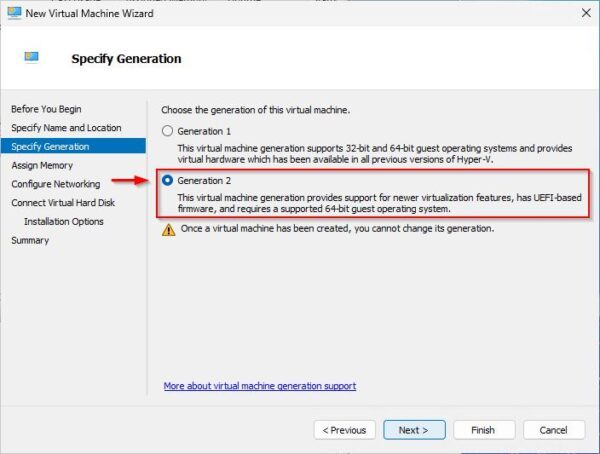
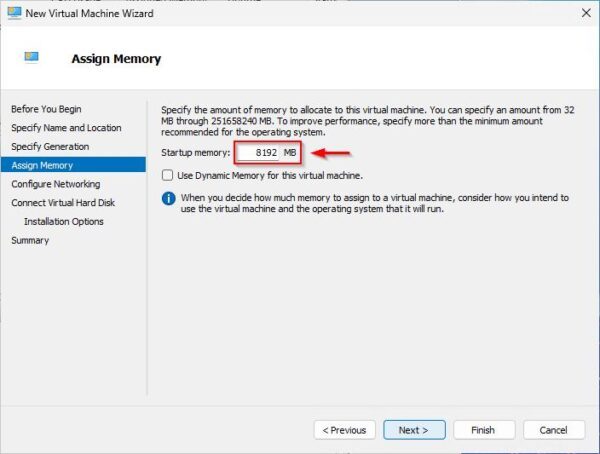
Specify the Startup memory and click Next.
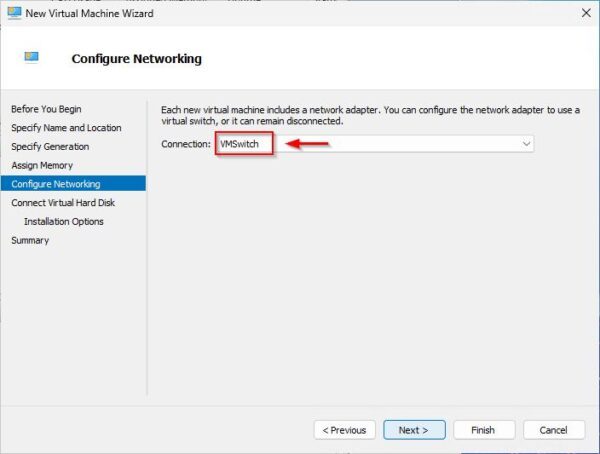
Select the Connection to use for the virtual machine and click Next.
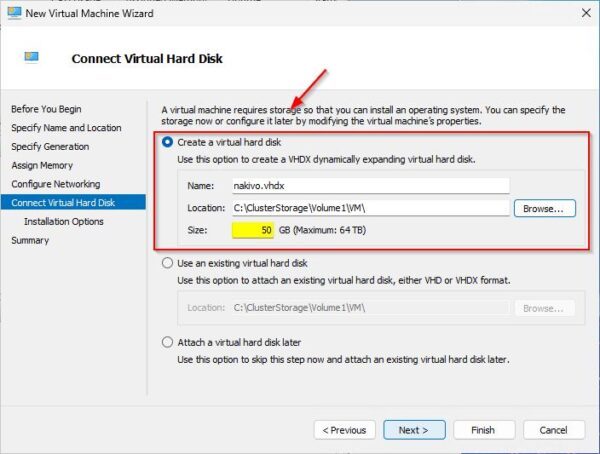
Select Create a virtual disk and specify the desired Size. Modify the Name and Location if needed then click Next.
Select Install an operating system from a bootable CD/DVD-ROM option, click Browse, and select the desired Image file (.iso). Click Next.
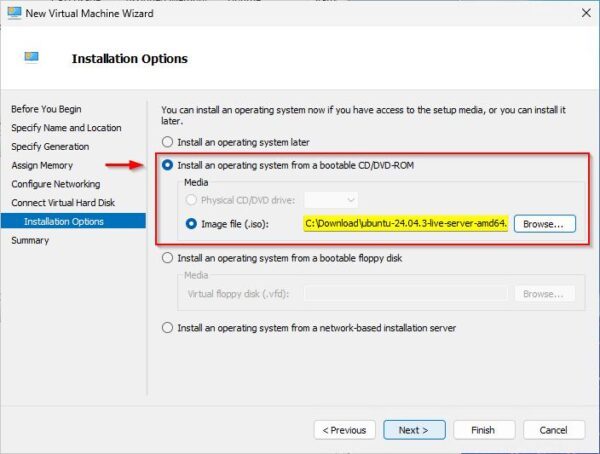
Click Finish.
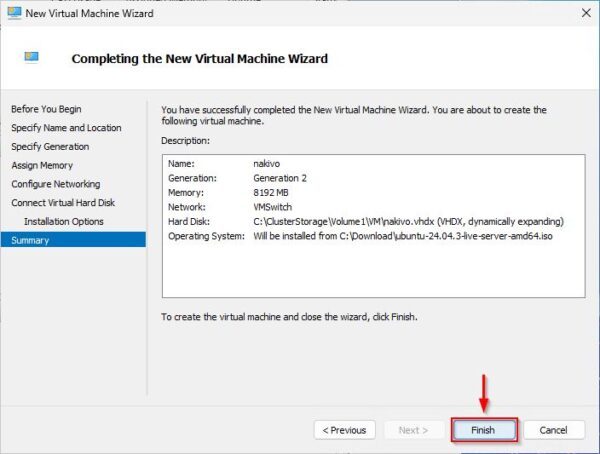
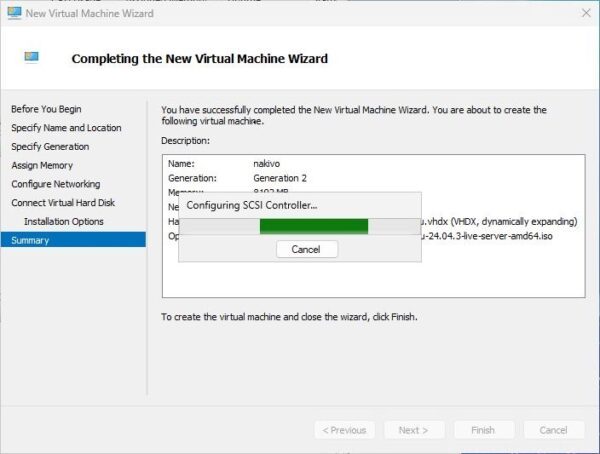
The VM is being created.
Configure VM settings
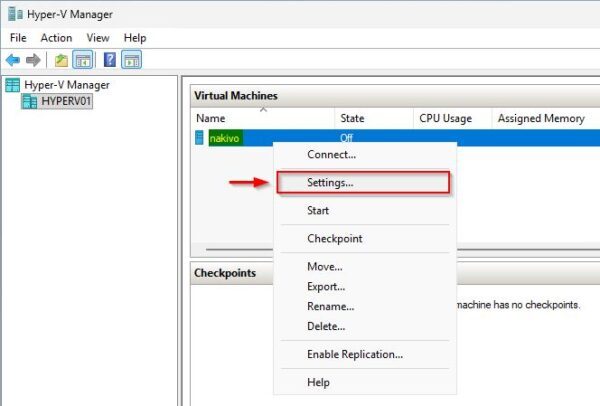
Right click the newly created VM and select Settings.
In the Firmware section, ensure the DVD Drive is at the top of the boot order list.
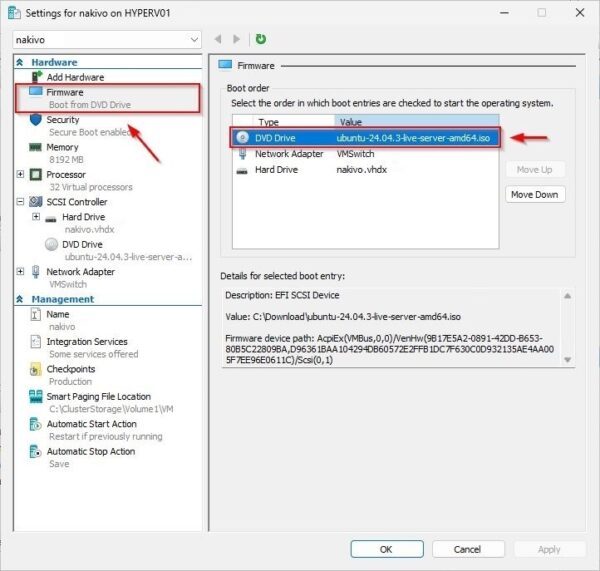
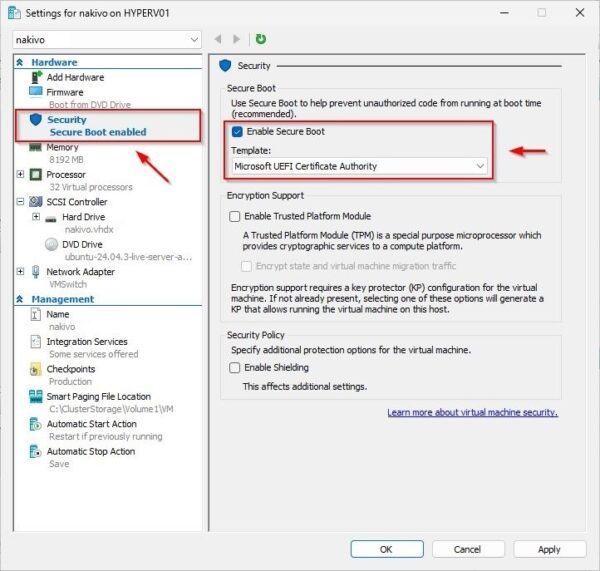
In the Security section, click Enable Secure Boot and select Microsoft UEFI Certificate Authority as the Template.
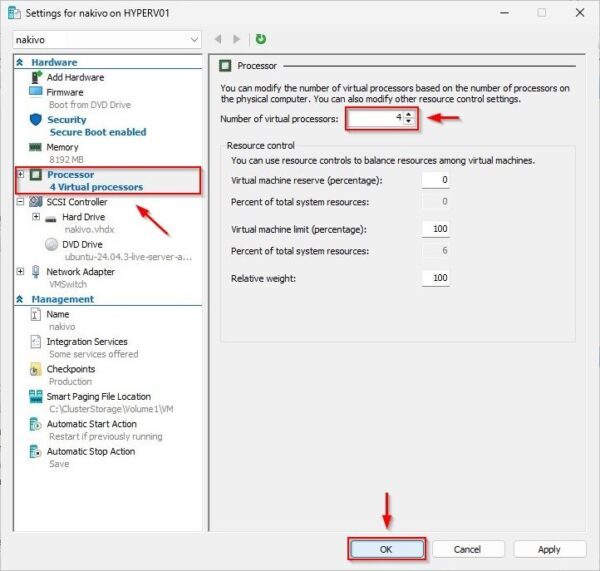
In the Processor section, specify the Number of virtual processors to assign to the machine.
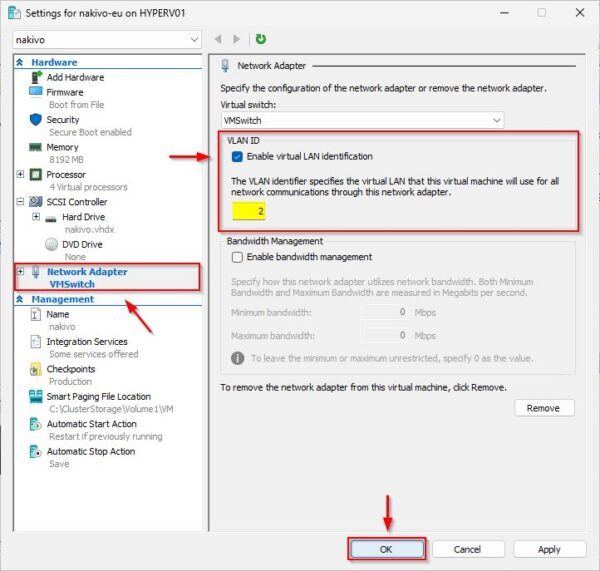
If the configured network uses VLANs, go to the Network Adapter section, thick Enable virtual LAN identification option and specify the VLAN ID. Click OK to apply the configuration.
Install the Linux OS
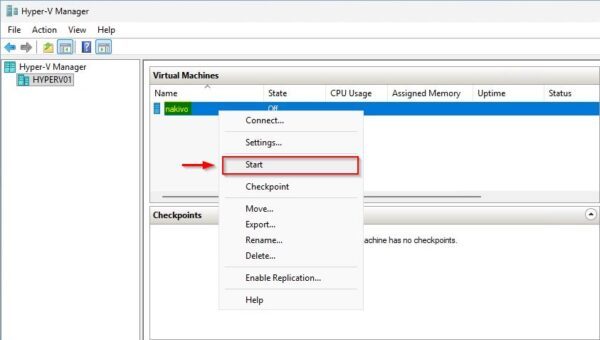
Power on the VM by right clicking it and selecting Start.
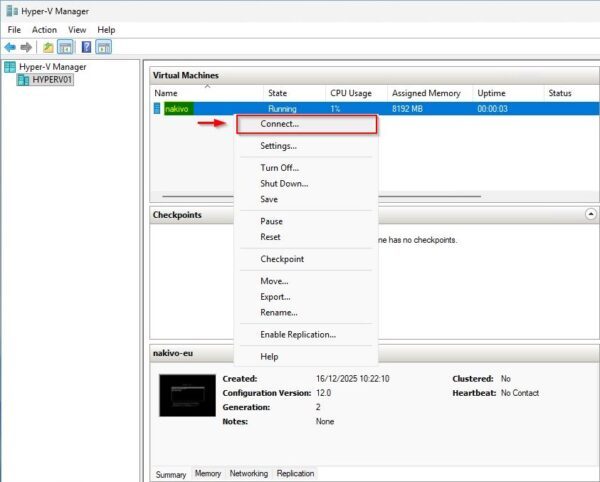
Right click the VM and select Connect to open the VM console.
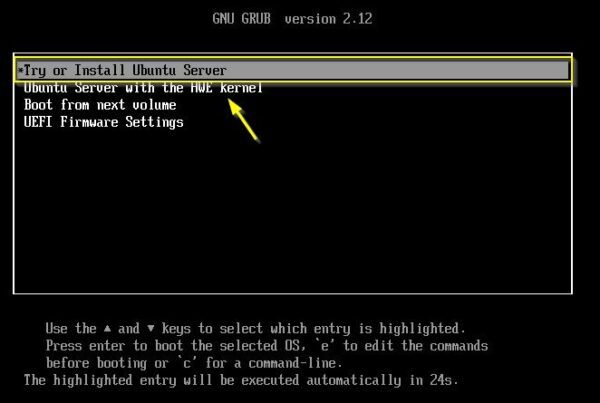
The Ubuntu installation wizard will appear. Follow the prompts to complete the OS installation.
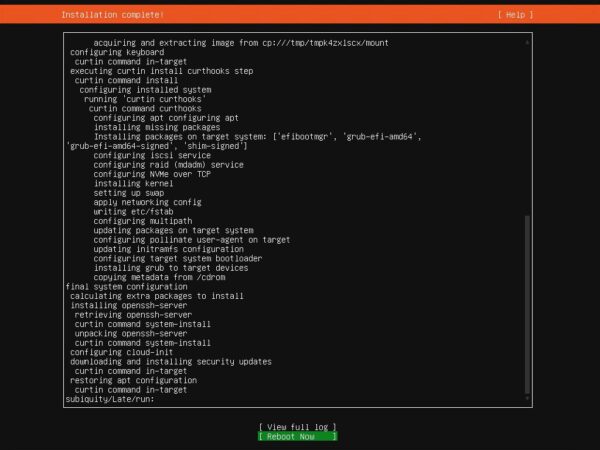
When the OS installation is complete, click Reboot Now.
After the reboot, SSH the Linux VM and ensure all available updates are installed.
# sudo apt update && sudo apt upgrade

Install Hyper-V Integration Services
To improve performance and functionality, virtual machines running on Hyper-V require Hyper-V Integration Services to be installed.
Integration Services are built into modern versions of Ubuntu Server (since 12.04) and are typically enabled automatically. If needed, you can enable them via Hyper-V Manager.
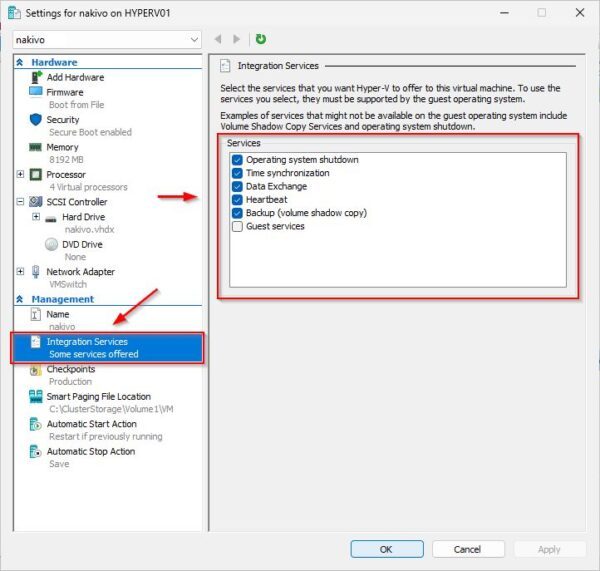
Install Nakivo on Hyper-V
SSH the newly created virtual machine to proceed with the installation of Nakivo Backup & Replication.
Install the required packages
Nakivo requires the installation of some packages on Linux.
# sudo apt install cifs-utils open-iscsi ntfs-3g tar

Install the software
Download the Nakivo installer file using the wget command. The installer will be downloaded to the /tmp folder.
# cd /tmp
# wget https://d111xps0uy3x00.cloudfront.net/res/product/NAKIVO_Backup_Replication_v11.1.0.98634_Installer-TRIAL.sh

Make the file executable.
# chmod +x NAKIVO_Backup_Replication_v11.1.0.98634_Installer-TRIAL.sh

Run the installer. Select the installer language and press Enter.
# sudo ./NAKIVO_Backup_Replication_v11.1.0.98634_Installer-TRIAL.sh

Press the key D on your keyboard until you reach the end of the EULA.

Type 1 then Enter to accept the EULA.

Select the Nakivo component to install (1 in the example).

The next step to install Nakivo on Hyper-V is to configure the Director settings. Unless you have specific requirements, the default values are appropriate for most environments.
- Leave the default install location (/opt/nakivo) - press Enter
- No custom certificates will be used - press Enter
- Type 1 to use a self-signed certificate - press Enter
- Leave the default HTTPS port (4443) - press Enter
- Type 1 to allow the automatic upload of support bundles - press Enter
- Leave the default Transporter port (9446) - press Enter
- Leave the default data transfer port range (9448-10000) - press Enter
- Leave the default Backup repository (/opt/nakivo/repository) - press Enter
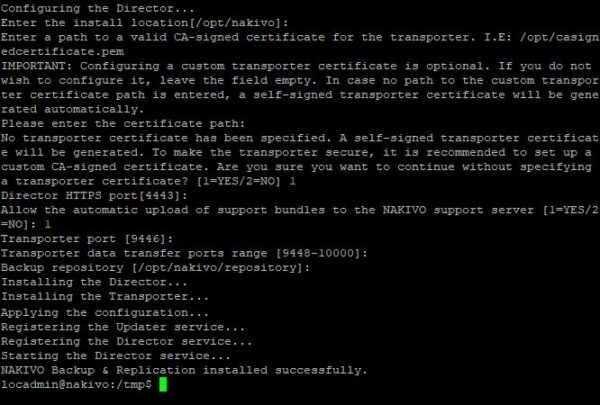
Once installation completes, open a browser and navigate to https://<IP_Server_Nakivo>:4443 to access the login page. The first time you access Nakivo you will be asked to create an administrative account. Click Create Account when done.

Configure Nakivo environment
Once you have logged into Nakivo, you must configure the platform you want to protect. In the Inventory area, click the + (plus) icon to add the environment to backup.
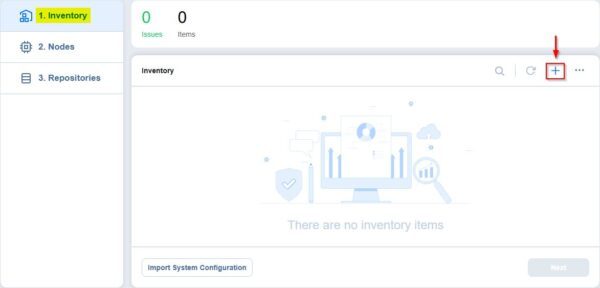
Select Virtual and click Next.
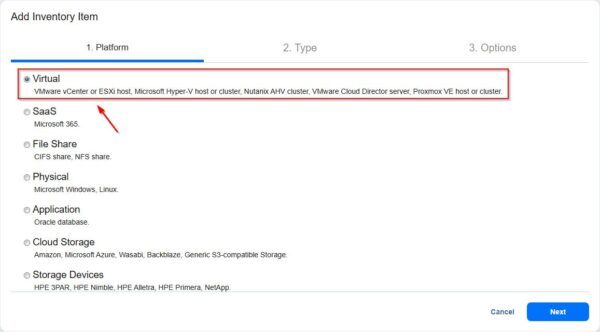
Since we want to protect VMs running on Hyper-V, choose Microsoft Hyper-V host or cluster then click Next.
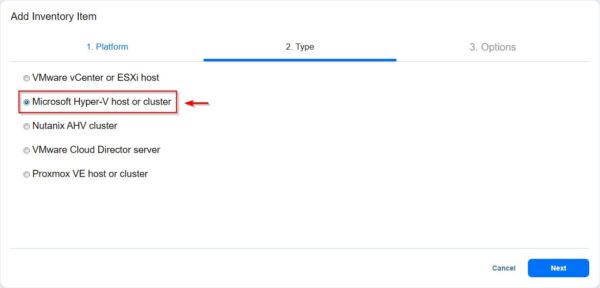
Enter the required configuration settings. For security best practices, use a dedicated service account (not the Administrator account) to link the Hyper-V cluster.
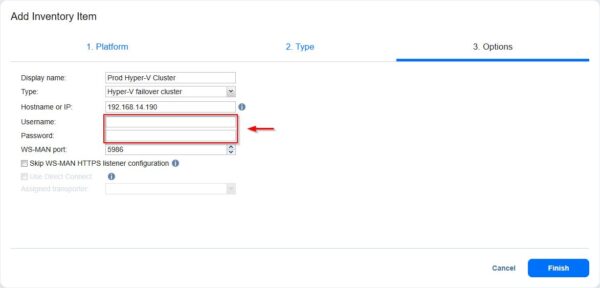
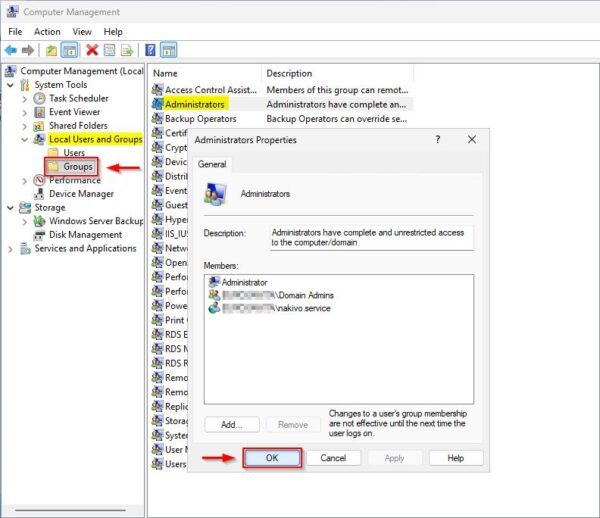
Create a custom service account
Create a Domain Account in Active Directory with a strong password. Add this account to the Local Administrator group on each Hyper-V cluster node.
It is possible that when attempting to add the Hyper-V cluster to Nakivo, you may receive an error similar to the one shown below.
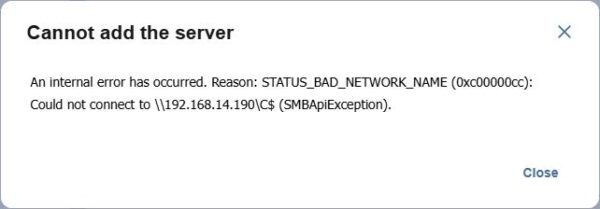
Here are several potential causes for an error at this stage. Recommended troubleshooting steps include the following.
- The service account is not Built-In Administrator.
- Port 5986 is not open on the Hyper-V nodes.
- The hostname cannot be resolved by DNS.
The service account is not Built-In Administrator
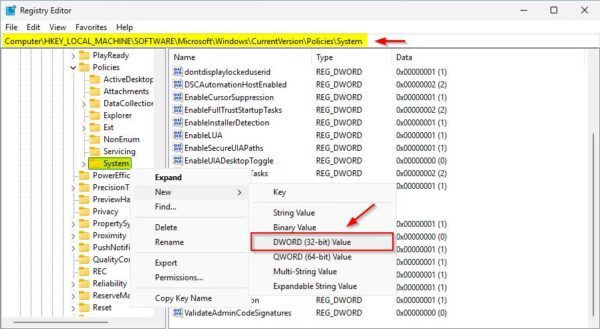
On each Hyper-V node, add the following registry key:
Key: HKEY_LOCAL_MACHINE\SOFTWARE\Microsoft\Windows\CurrentVersion\Policies\System
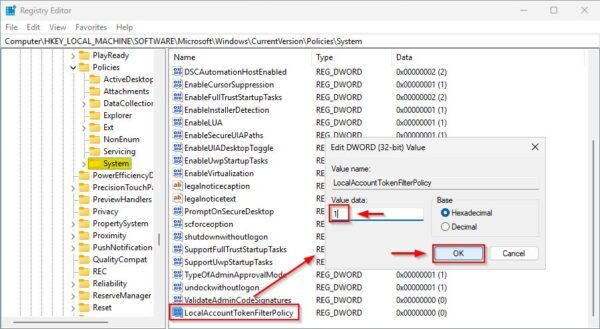
Value name: LocalAccountTokenFilterPolicy
Type: REG_DWORD (32-bit)
Value data: 1
Open the Registry Editor and navigate to the key path. Right click System and select New > DWORD (32-bit) Value.
Name the key as LocalAccountTokenFilterPolicy and set the Value data to 1.
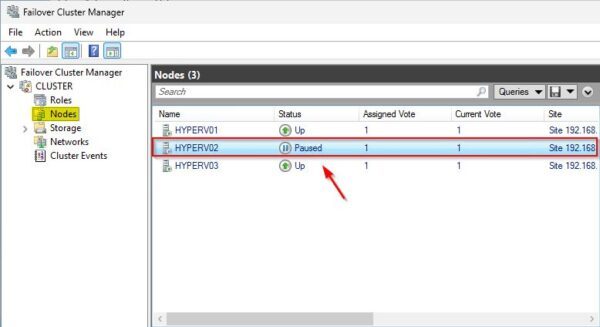
Put the node in Pause then reboot.
Port 5986 is not open on Hyper-V nodes
Verify the current status of the WinRM listener on each Hyper-V node.
PS C:\> winrm enumerate winrm/config/listener
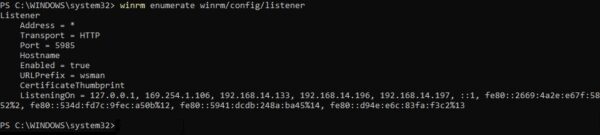
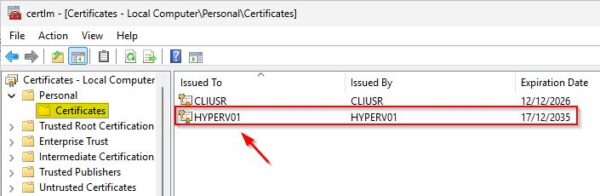
If port 5986 is not listed, you must enable WinRM over HTTPS. First, generate a self-signed certificate on each node.
PS C:\> $NewCert = New-SelfSignedCertificate -DnsName "HOSTNAME" -CertStoreLocation Cert:\LocalMachine\My -NotAfter (Get-Date).AddYears(10)

You can verify the certificate in the Certificate Manager (certlm.msc) under Personal > Certificates.
Enable the WinRM listener on port 5986 using the certificate's thumbprint.
PS C:\> $Thumbprint = $NewCert.Thumbprint
PS C:\> winrm create winrm/config/listener?Address=*+Transport=HTTPS "@{Hostname=`"HOSTNAME`"; CertificateThumbprint=`"$Thumbprint`"}"

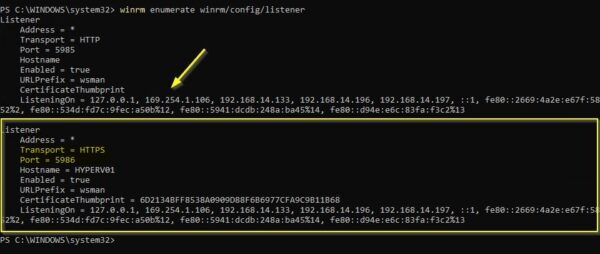
Verify the listener is active by running the check again. Now port 5986 should now appear.
PS C:\> winrm enumerate winrm/config/listener
From the Nakivo Linux VM, test connectivity to the Hyper-V node on port 5986.
# nc -vz SERVER IP_ADDRESS 5986

Check if DNS can resolve hostnames
Use the ping command to verify DNS resolution from the Nakivo server.
# ping HOSTNAME_FQDN
Add Hyper-V to the Nakivo Inventory
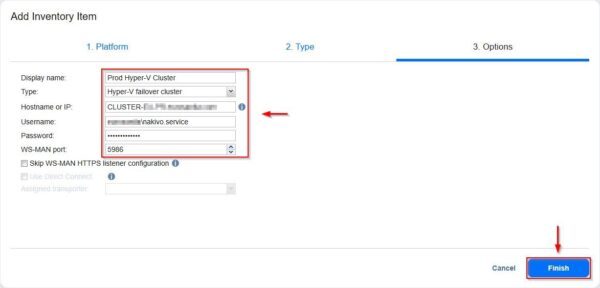
Return to the Nakivo console, enter the service account credentials, and click Finish. If the Hyper-V cluster fails to add when using its cluster IP or DNS name, try using the IP address or DNS name of an individual node instead.
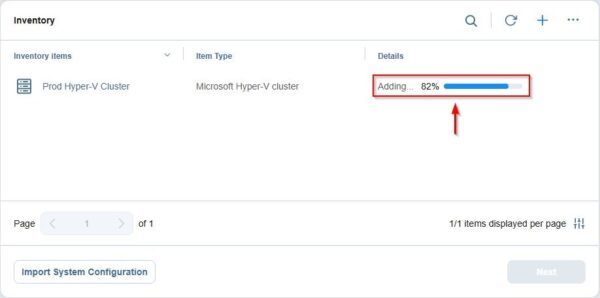
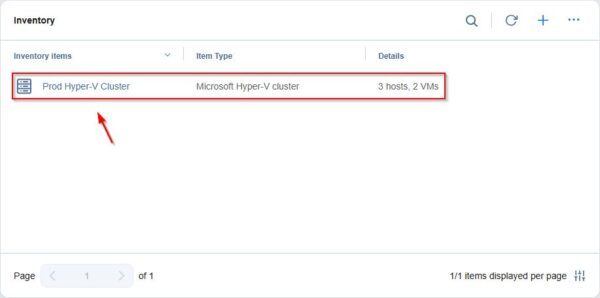
The Hyper-V cluster is being added to the Inventory.
The process is completed successfully.
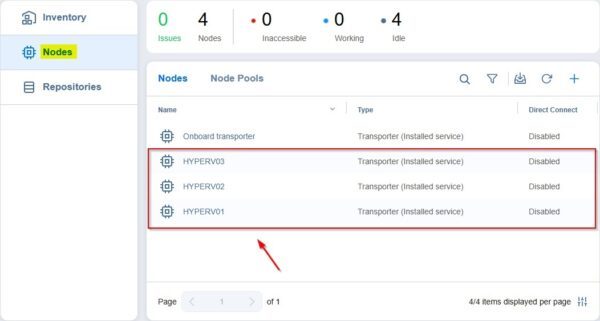
Add Transporters
Navigate to the Nodes section to view the configured Transporters. Note that Transporters are automatically installed on all Hyper-V nodes that are members of the cluster.
Add a Backup Repository
The final configuration step is to create a Backup Repository where backups will be stored. This example adds a Hardened Repository.
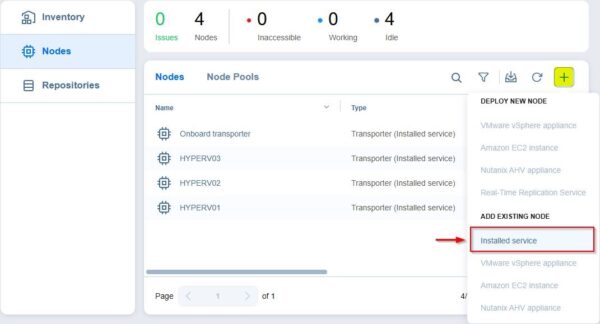
In the Nodes section, click the + (plus) icon and select Installed service.
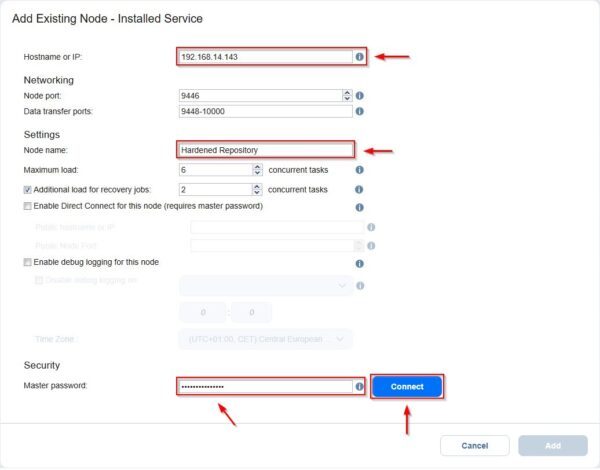
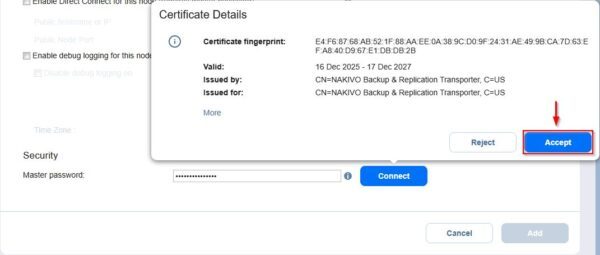
Enter the Hostname or IP of the Backup Repository Transporter and assign a Node name. For security, set a Master password to secure communication with the Nakivo Server. Click Connect to verify the connection.
Click Accept to accept the Certificate Thumbprint.
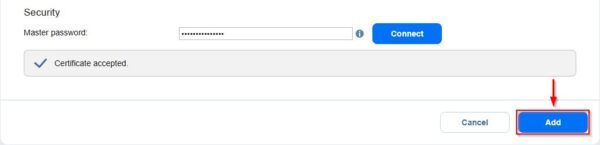
A success message confirms the connection. Click Add.
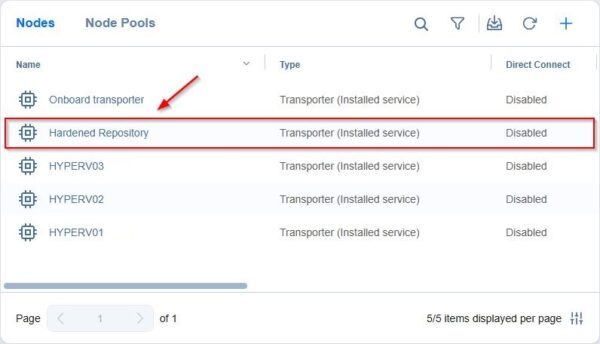
The Transporter has now been successfully added to Nakivo.
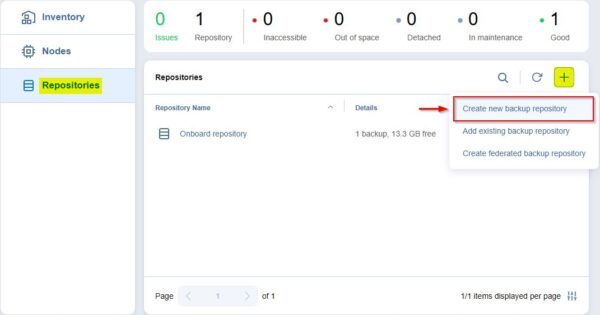
Now navigate to Repositories, click the + (plus) icon and select Create new backup repository.
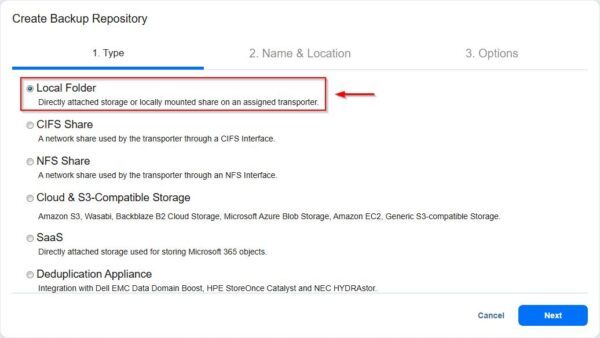
Select Local Folder and click Next.
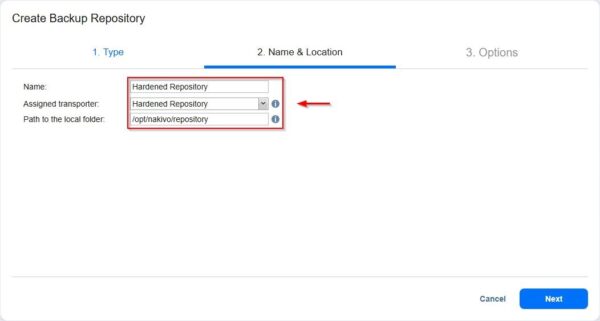
Enter a Name for the repository, select the previously added Assigned Transporter and specify the correct Path to the local folder. Click Next.
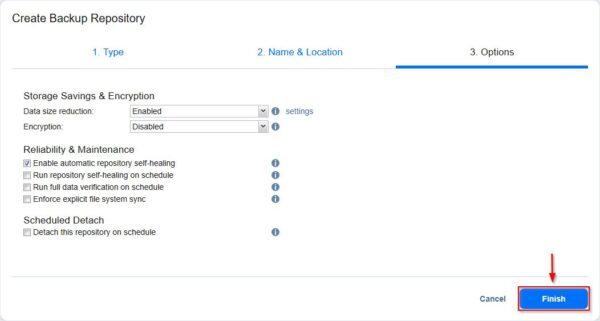
Click Finish to create the Repository. Keep in mind if you enable Encryption you will lose the Immutability capability.
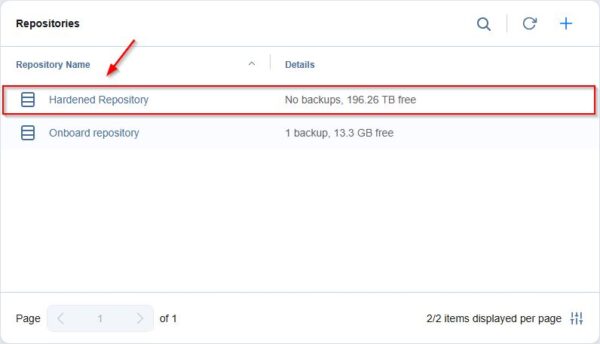
The new Hardened Repository has been successfully created in Nakivo.
Now the infrastructure is configured and you can proceed by creating the required Backup Jobs to protect the workloads running on the Hyper-V cluster.
Nakivo Backup & Replication is available to download as 15-day trial.